
Hikvision access controllers and face terminals are everywhere in the GCC, from small offices to residential towers. The hardware is usually wired correctly; where projects go wrong is the software side. Persons are added but never applied to the device, schedules block staff on the wrong weekend, or the door alarms every time it is held open. This guide walks through Hikvision access control configuration step by step: activating the device, adding it to the software, enrolling persons with cards, fingerprints and faces, building schedules and access groups, setting door parameters and checking events. It finishes with a worked 4-door office example.
Quick answer: activate the device and set its IP (SADP tool or web browser), add it to iVMS-4200 or HikCentral Professional, add persons and their credentials, create a schedule template, combine persons, schedule and doors into an access group (iVMS-4200) or access level (HikCentral), then apply it to the devices. Finally set door parameters such as open duration and door open timeout, and test with the event search.
A note on versions: menu names below are taken from Hikvision’s own manuals: iVMS-4200 V3.13.1, HikCentral Professional V3.1.0 Web Client, and the DS-K262XX series controller web manual (V1.3). Hikvision renames menus between versions and device families, so your screen may differ slightly. Where that happens, the step is the same; look for the nearest equivalent.
Hikvision Access Control Configuration: Which Software to Use
| Tool | Best for | Notes |
|---|---|---|
| Device web page | 1 to 2 standalone devices | Built into newer controllers and face terminals; no PC software needed |
| iVMS-4200 client | Small and medium sites | Free Windows client; uses “Access Group” |
| HikCentral Professional | Large, multi-site, integrated with CCTV | Licensed server platform; uses “Access Level” |
Pick one platform as the master database. If you add persons on the device web page and then manage the same device from iVMS-4200 or HikCentral, the software may overwrite the device’s data when you apply. Decide early and stick with it.
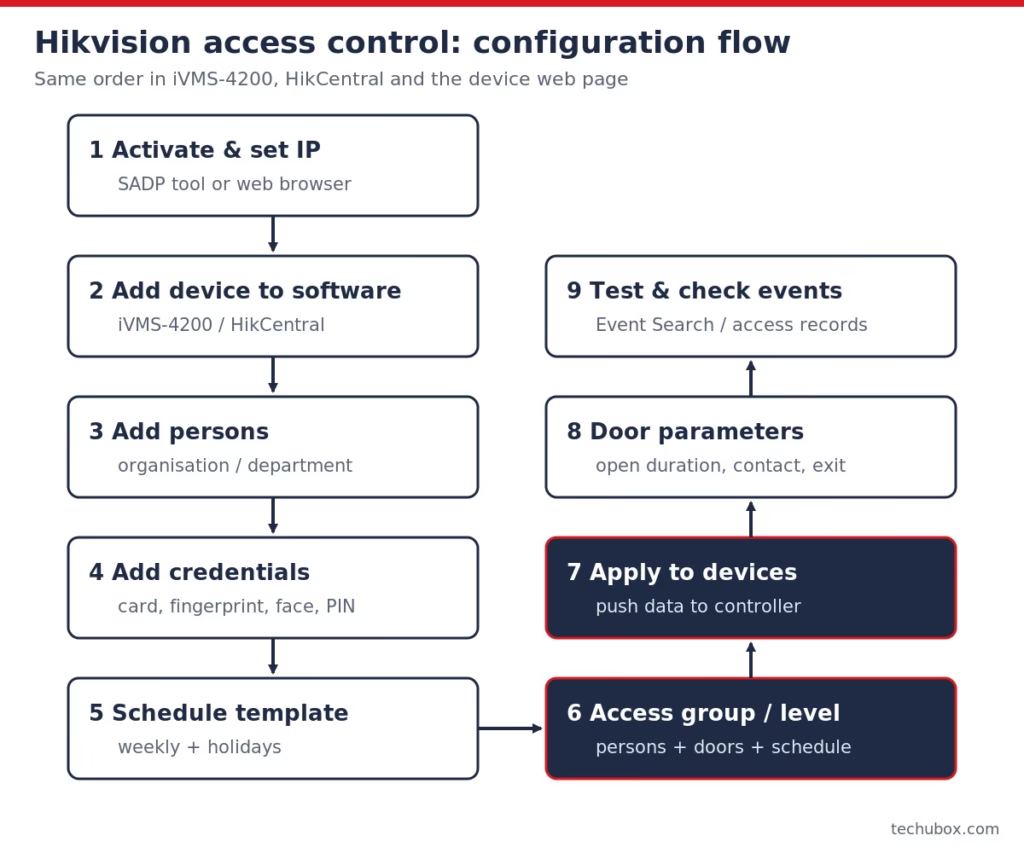
Step 1: Activate the Device and Set the IP Address
A new Hikvision access device must be activated before first use. According to the DS-K262XX controller manual, the defaults are IP 192.0.0.64, port 8000 and user name admin. Face terminals and other models may use different defaults, so check the quick start guide.
- Connect the PC to the same network segment as the device.
- Run the SADP tool, select the inactive device, and create a strong admin password. You can also activate from a browser by entering the default IP.
- In SADP, change the IP address, subnet and gateway to suit the site, or enable DHCP (a fixed IP is better for access control).
- Log in to the web page and set the time zone and NTP time sync. Wrong time means wrong schedules and useless event logs.
My field advice: record the IP, MAC, serial number and password for every controller in a handover sheet on day one. Set the security questions or recovery email during activation; it saves a lot of trouble later.
Step 2: Add the Device to iVMS-4200 or HikCentral
iVMS-4200: go to Device Management → Device, click Add and choose IP/Domain. Enter a name (use the location, for example “GF-Main-Entrance”), the IP address, port 8000, user name and password. Tick Import to Group so the doors appear as access points. You can also add devices found on the LAN as online devices.
HikCentral Professional: go to Basic Management → Device → Device and Server, then the Access Control Device list, and add the device by IP address or as an online device. Next, add the device’s doors to an Area, because HikCentral assigns permissions to doors through areas.
Check that the device shows online before going further.
Step 3: Add Persons and Organisations
Create the structure first: organisations (iVMS-4200) or departments (HikCentral), such as Administration, Finance, IT. Then add persons:
- iVMS-4200: open the Person module, select the organisation and click Add. Fill in name, person ID and validity period.
- HikCentral: Basic Management → Person, then add a single person or import from a template.
- Device web: Person Management → Add (employee ID, name, person type, and validity period).
For more than about 20 people, use the Excel import template. Typing 200 names by hand is where typos and duplicate IDs come from.
Pro tip: use the company’s HR employee number as the person ID. It makes attendance exports and later integrations much easier.
Step 4: Add Credentials: Cards, Fingerprints and Faces
Cards
In iVMS-4200, inside the Add Person window, go to Credential → Card and click the add icon. You can type the card number, read it with a USB card enrolment station (Local mode), or read it by presenting the card at a door reader (remote mode). Up to five cards can be issued to one person. On the device web page, use Add Card in Person Management.
Check the card settings on the device too. The controller web page has Card Settings where you enable EM, M1 (MIFARE Classic), DESFire or FeliCa cards, and set M1 Card Encryption with a sector. If a third-party reader is connected over Wiegand, set the matching Wiegand mode (26 or 34-bit). See access control card types for which card to choose and Wiegand vs OSDP for the reader link.
Fingerprints
Fingerprints can be collected with a USB fingerprint recorder on the PC or through a fingerprint-capable reader on the device. Enrol two fingers per person, normally the index fingers of both hands, so that a cut finger does not lock someone out.
Faces
Click Add Face in the person’s details. Upload a photo (iVMS-4200 expects JPG, under 200 KB), take one with a USB camera, or capture directly on the face terminal. Use a front-facing, evenly lit photo without glasses glare. Face data is personal data; in Saudi Arabia the Personal Data Protection Law applies, so get the client’s privacy policy and staff consent process sorted before enrolment. For a wider comparison of biometric options read fingerprint vs face recognition.
Step 5: Create Schedule Templates
A schedule template defines when access is allowed.
- iVMS-4200: Access Control → Schedule Template → Schedule Template. Two defaults exist, All-Day Authorized and All-Day Denied, and they cannot be edited. Click Add, draw time periods on the week schedule (up to 8 periods per day), and attach holidays created under Access Control → Schedule → Holiday.
- HikCentral: Basic Configuration → Access Schedule Template. Defaults are All-day, Workday and Weekend templates; a holiday schedule overrides the weekly schedule.
- Device web: Access Control → Permission Management → Access Plan Management.
Pro tip: the default “workday” templates assume a Monday to Friday week. In Saudi Arabia the working week is Sunday to Thursday, so create your own template rather than relying on a default. Add public holidays such as Eid as holiday periods.
Step 6: Create Access Groups or Access Levels
This is the step that ties who, when and where together.
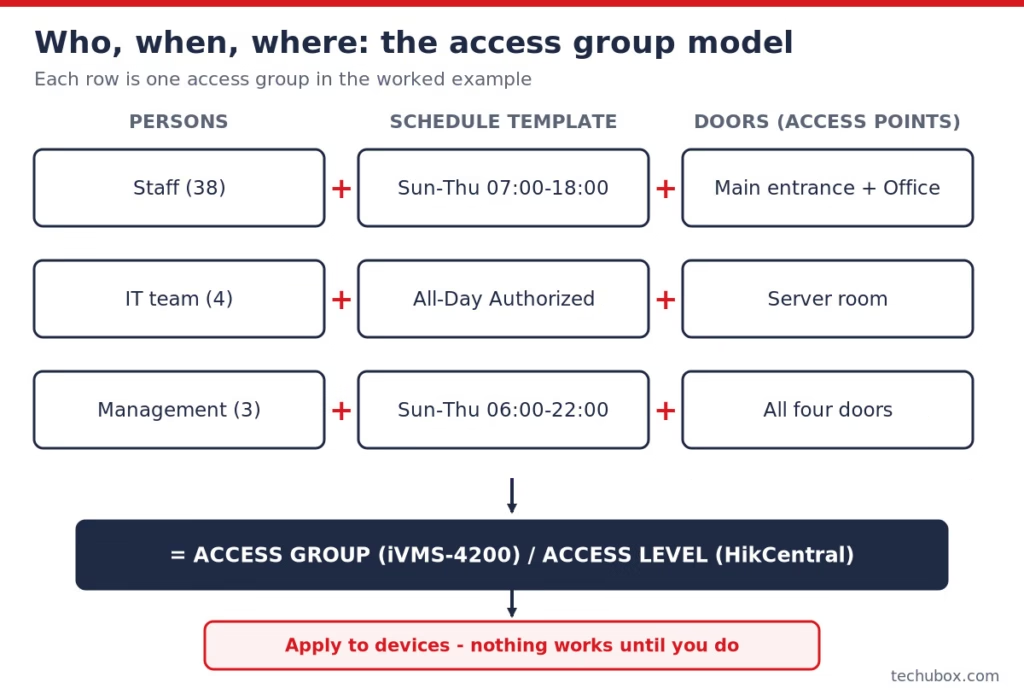
iVMS-4200: Access Group
- Go to Access Control → Authorization → Access Group and click Add.
- Name the group, select the schedule template, select persons, and select the access points (doors).
- Click Save. The manual allows up to 50 access groups.
HikCentral Professional: Access Level
HikCentral separates the idea into two parts. Go to Access Level → Manage Access Level, click Add, select the access points (doors) and the access schedule, and save. Then assign the access level to persons, departments or access groups.
Apply to devices
This is the most missed step on site. In iVMS-4200, select the groups and click Apply All to Devices (clears and rewrites the device’s permissions) or Apply Changes to Devices (sends only the changes), then watch the status column. Every time you change a person, card, face or schedule, the software shows a prompt that data is waiting to be applied. If a new staff member’s card “does not work”, check this first.
Step 7: Set Door Parameters
In iVMS-4200 go to Access Control → Advanced Function → Device Parameter, select the device and then the door. On the device web page, use Access Control → Parameter Settings → Door Parameters. In HikCentral, edit the door from the device or area list. The key parameters are:
| Parameter | What it does | Typical setting |
|---|---|---|
| Open Duration (Door Locked Time) | How long the lock stays released after a valid credential (1 to 255 s on the DS-K262XX) | 5 s for normal doors |
| Extended Open Duration | Longer release for persons flagged for extended access | 15 s for wheelchair users |
| Door Open Timeout Alarm | Alarm if the door is left open too long; 0 disables it | 30 to 60 s |
| Door Contact | Normal state of the door sensor: Remain Closed (NC) or Remain Open (NO) | Match the wiring, usually NC |
| Exit Button Type | Normal state of the REX input | Usually Remain Open (NO) |
| Lock Door when Door Closed | Relocks as soon as the door shuts, without waiting for the open duration | On for high-traffic doors |
| Duress Code / Super Password | Special PINs for duress alarm or override | Set only if required, keep different from user PINs |
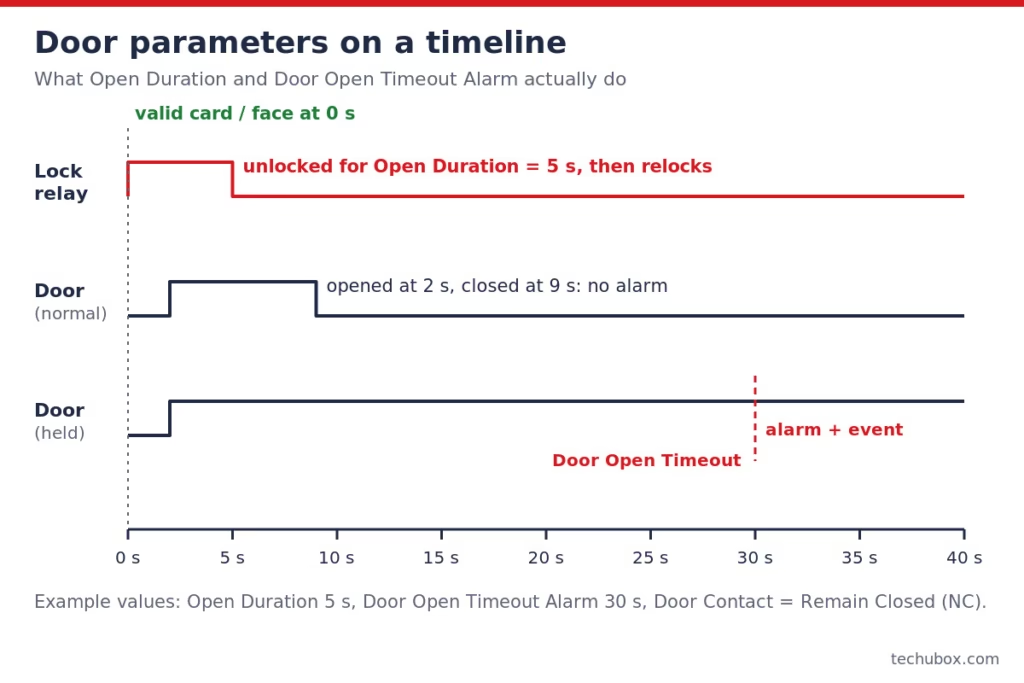
If the Door Contact type does not match the wiring, the controller thinks the door is always open and you get endless “door open timeout” or “door abnormally open” events. Wiring details are in our REX button and door contact wiring guide, and lock selection in fail-safe vs fail-secure locks.
My field advice: fire alarm release of escape doors should be done in hardware, by the fire alarm relay cutting lock power or driving the controller’s fire input, not only by a software rule. Coordinate with the Civil Defense-approved fire alarm contractor. See access control and fire alarm integration.
Step 8: Check Events and Test
In iVMS-4200, first arm the device so the client receives events: Tool → Device Arming Control and turn on Auto-Arming. Then use Monitoring for live door status and real-time access records, and Event Center → Event Search for history, filtered by person, card number, door or event type. In HikCentral use Search → Person Authentication Record. On the device web page, go to Access Control → Event Search.
Test every door with: a valid credential inside the schedule, a valid credential outside the schedule (must be denied), an unknown card, the exit button, and holding the door open past the timeout. Save the event export as part of the handover file.
Practical Example: 4-Door Office, 45 Staff
A small Riyadh office has one 4-door Hikvision controller (DS-K2600 series class), card readers on all doors, and a face terminal at the main entrance.
- Doors: Main Entrance, Office Area, Server Room, Store.
- Staff: 38 general staff, 4 IT, 3 management = 45 persons.
- Credentials: 45 cards + 45 faces = 90 credentials, well within typical device capacity (check the datasheet).
Access groups
| Group | Persons | Schedule | Doors |
|---|---|---|---|
| Staff | 38 | Sun to Thu 07:00 to 18:00 | Main Entrance, Office Area |
| IT | 4 | All-Day Authorized | Server Room (plus Staff group for other doors) |
| Management | 3 | Sun to Thu 06:00 to 22:00 | All four doors |
A person can belong to more than one group, so the IT team are members of both Staff and IT. That keeps each group simple.
Door timing
Open Duration 5 s on all doors; one staff member uses a wheelchair, so set the Extended Open Duration to 15 s and enable extended access for that person only. Door Open Timeout Alarm: 30 s on the Server Room and Store, 60 s on the Main Entrance where deliveries come in.
Power check
Controller about 0.5 A, four readers at about 0.12 A each (0.48 A), four maglocks at 0.5 A each (2.0 A): total about 3.0 A at 12 V DC. A 5 A supply runs at 60% load. Typical values only; use the datasheets and size the battery with the Battery Backup Calculator. You can lay out the whole system in the Access Control Designer.
Troubleshooting
| Symptom | Likely cause | Fix |
|---|---|---|
| New person’s card is refused | Access group not applied to device | Apply changes to devices and check the status column |
| Access denied on Sunday morning | Default Monday to Friday template used | Create a Sunday to Thursday template and reassign it |
| Card number shows differently from the printed one | Wiegand 26/34 mismatch or card read mode (3 byte, 4 byte, full) | Match Wiegand mode and card authentication mode |
| Constant door open timeout alarms | Door Contact type wrong (NO vs NC) or contact not fitted | Match setting to wiring; disable only if no contact is installed |
| Exit button unlocks door permanently | Exit Button Type set opposite to wiring | Set Remain Open for a NO button |
| No events in iVMS-4200 | Device not armed | Tool → Device Arming Control, enable auto-arming |
| Schedules wrong by hours | Time zone or NTP not set | Set UTC+03:00 (Riyadh) and NTP on device and PC |
| Faces fail to apply | Photo too large or poor quality | Re-capture a front, evenly lit photo under the size limit |
Finally, harden the system: unique strong passwords, latest firmware from Hikvision’s official site, controllers on a separate VLAN, and no port forwarding to the internet. Our CCTV cybersecurity guide and VLAN guide apply equally to access control. To link doors with cameras, see access control and CCTV integration.
Frequently Asked Questions
What is the default IP address of a Hikvision access controller?
The DS-K262XX series manual lists 192.0.0.64, port 8000, user name admin. Other models may differ, so check the quick start guide. Use the SADP tool to find and activate devices on the LAN.
Why does a new card not open the door after I add the person?
Usually the access group or access level has not been applied to the device. In iVMS-4200, click Apply Changes to Devices and confirm the status shows success. Also check the person’s validity period and the schedule.
What is the difference between an access group and an access level?
In iVMS-4200 an access group combines persons, a schedule template and doors. In HikCentral Professional an access level groups doors with an access schedule, and you then assign it to persons, departments or access groups.
Can I configure Hikvision access control without software?
Yes, for small sites. Newer controllers and face terminals have a web page with Person Management, permission schedules, door parameters and event search. For several devices, central software is easier to manage.
How long should the door open duration be?
Around 5 seconds suits most office doors. Use the extended open duration for persons who need more time, and set a door open timeout alarm of 30 to 60 seconds depending on how the door is used.
Should I use iVMS-4200 or HikCentral Professional?
iVMS-4200 is free and suits small and medium single-site systems. HikCentral Professional is licensed and better for large, multi-site projects or where access control must be tightly integrated with video, visitors and attendance.