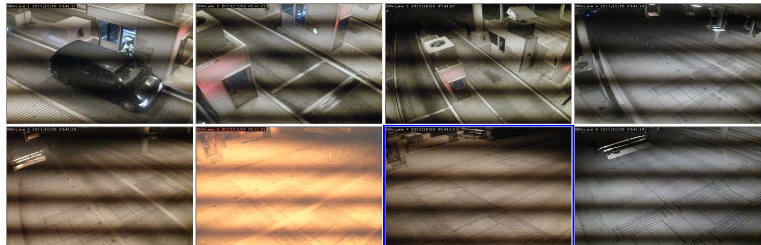
CCTV Camera Placement Guide: Angles, Heights & Coverage
CCTV Camera Placement Guide: Angles, Heights & Coverage Zones
Key Takeaways
- Strategic Placement is Paramount: Effective surveillance hinges on thoughtful CCTV camera placement, ensuring every critical area is monitored without blind spots.
- Angles Dictate Detail: Understanding the nuances of narrow, standard, and wide-angle lenses, along with optimal downward angles, is crucial for capturing essential details, from facial recognition to broad-area monitoring.
- Height Balances Coverage and Security: The ideal CCTV camera height varies significantly by environment and objective, balancing wide-area coverage with the ability to capture fine details and deter tampering.
- Comprehensive Coverage is Achievable: Mastering CCTV coverage zone planning, including DORI standards and strategic overlap, is essential for eliminating vulnerabilities and ensuring continuous monitoring.
- Planning Prevents Pitfalls: Utilising tools like FOV calculators and conducting thorough site surveys are vital steps in avoiding common placement mistakes and optimising your security camera placement.
-
Introduction: Why Proper Camera Placement Matters
In an increasingly complex world, Closed-Circuit Television (CCTV) systems are indispensable for modern security. However, their effectiveness isn’t guaranteed by presence; it hinges on strategic CCTV camera placement. A poorly positioned camera offers limited actionable intelligence, while a strategically placed one provides clear, comprehensive coverage, deterring crime, identifying, and offering crucial evidence.
This article guides optimal CCTV camera placement, offering expert insights from ELV and security systems engineering. We will cover camera angles, mounting heights, and coverage zones, providing practical recommendations for designing and implementing a truly protective surveillance system. Understanding these principles is paramount to transforming your CCTV system into a robust, intelligent security asset, maximising both deterrence and investigative capabilities.
-
Understanding Camera Angles for Optimal Surveillance
The angle of a CCTV camera influences its effectiveness, determining what it sees and the quality of captured footage. A well-chosen angle can mean the difference between clear facial images and obscured views. Understanding lens types and their angles is fundamental to effective CCTV camera placement.
Narrow-Angle Lenses: Precision and Detail
Narrow-angle lenses (6mm+ focal length, <30 degrees FOV) offer a restricted, focused view, invaluable for precise detail over distance. Ideal for monitoring specific entry points, capturing license plates, or long corridors. They provide exceptional detail within their scope, crucial for identification, but require careful aiming and often multiple cameras for larger areas.
Standard-Angle Lenses: Balanced Coverage
Standard-angle lenses (around 4mm focal length, 30-60 degrees FOV) balance wide coverage with sufficient detail. These lenses are suitable for general room surveillance, driveways, or medium-sized outdoor areas, providing a natural perspective for many general-purpose security camera placement scenarios.
Wide-Angle Lenses: Broad Perspective
Wide-angle lenses (2.8mm- focal length, >60 degrees FOV, up to 110+) provide a wide view, excellent for large open areas, small rooms, or panoramic views. They are suitable for capturing broad overviews, but the trade-off is lower pixel density on distant objects, compromising fine detail. Best for detection and observation, not recognition or identification, unless subjects are very close.
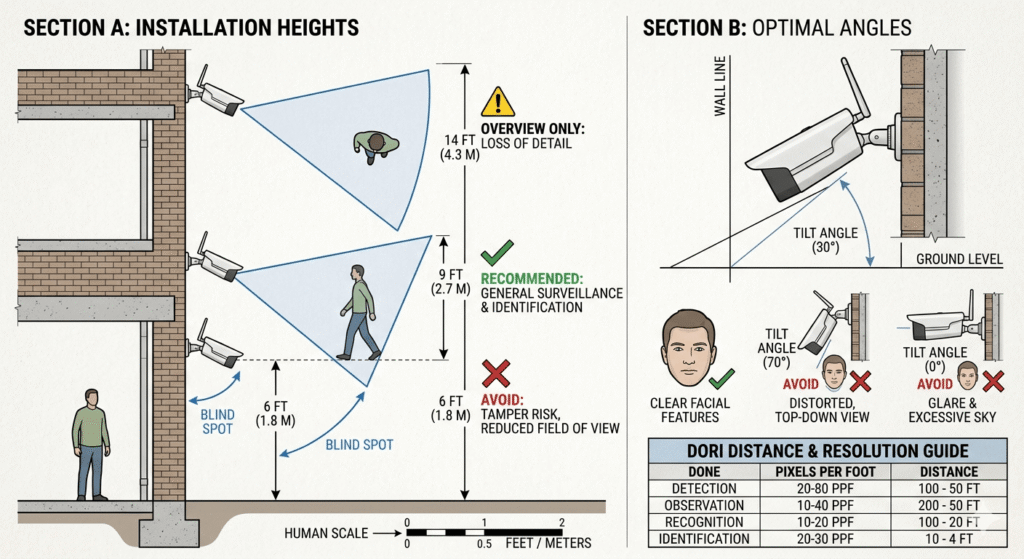
The Importance of Downward Angle
Incorporating a slight downward angle (15-30 degrees) in your CCTV camera placement is critical. This capture faces rather than just head-tops, aids identification, makes the camera less susceptible to tampering, and mitigates issues with direct light sources. Avoiding extreme angles prevents image distortion and ensures useful, clear footage.
-
Optimal Mounting Heights for Different Scenarios
CCTV camera height is pivotal for surveillance effectiveness and camera vulnerability. Balancing a wide field of view with sufficient detail for identification is crucial. Too high, and only head-tops are captured; too low, and it’s vulnerable to tampering. Ideal camera mounting height depends on the environment and surveillance objective.
Indoor Environments
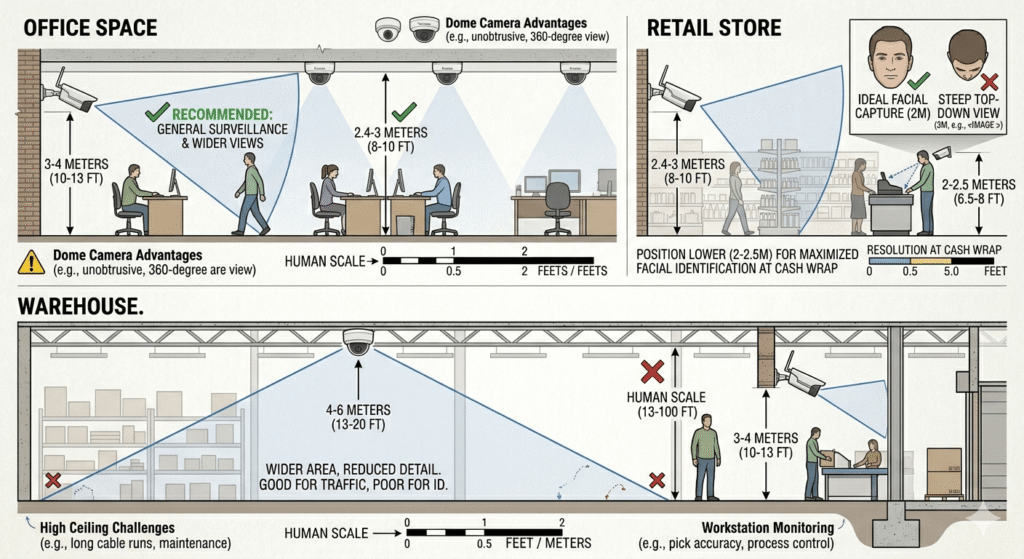
- Office Spaces: 4 to 3 meters (8 to 10 feet) for general surveillance, providing an overview and deterring tampering. Higher mounts for wider views in open-plan offices, often using ceiling-mounted dome cameras.
- Retail Stores: 4 to 3 meters (8 to 10 feet) for aisles and general activity. For cash registers, where facial identification is paramount, position cameras lower, typically 2 to 2.5 meters (6.5 to 8 feet), angled for clear facial capture.
- Warehouses: Due to high ceilings, high-bay areas require 4 to 6 meters (13 to 20 feet) for a broad overview. Loading docks or workstations needing more detail might be 3 to 4 meters (10 to 13 feet).
Outdoor Environments
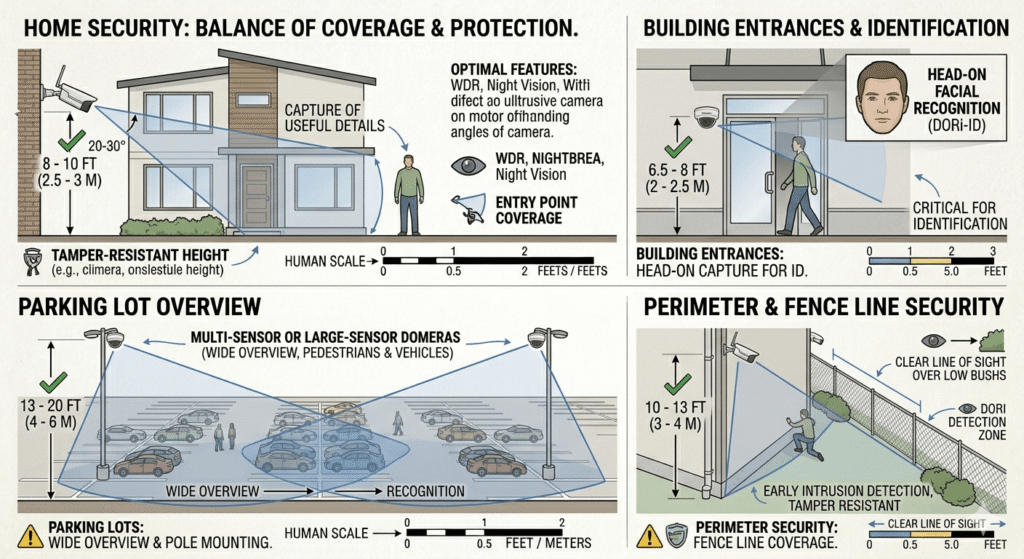
- Home Security: 5 to 3 meters (8 to 10 feet) offers deterrence, coverage of entry points, and protection against tampering, while capturing useful details.
- Building Entrances: For clear facial recognition, mount cameras at 2 to 2.5 meters (6.5 to 8 feet), angled to capture faces head-on. Critical for CCTV camera placement for identification.
- Parking Lots: Large parking areas require cameras on poles at 4 to 6 meters (13 to 20 feet) for wide overview of vehicles and pedestrians. Overlapping views are essential.
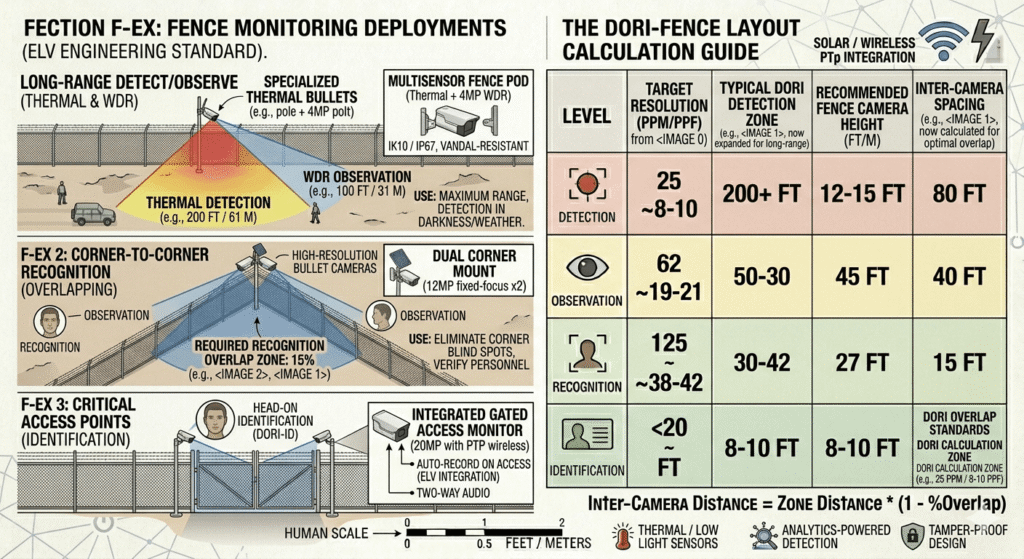
- Perimeter Security: For building perimeters and fence lines, mount cameras at 3 to 4 meters (10 to 13 feet) to prevent tampering and clear obstacles, focusing on early intrusion detection.
Remember the trade-off: higher mounting provides broader coverage but less detail; lower mounting offers greater detail but narrower FOV and increased vulnerability. A comprehensive plan integrates cameras at various heights.
Mastering Coverage Zones and Eliminating Blind Spots
Effective surveillance defines and covers specific CCTV coverage zones. A well-planned strategy ensures all critical points are monitored, supporting objectives from detection to identification.
How to Calculate Coverage: The DORI Standard
The DORI standard (Detection, Observation, Recognition, Identification) assesses camera coverage by quantifying pixel density on target:
- Detection (25 ppm): Presence detected, no details. Useful for alerts.
- Observation (62 ppm): General characteristics (clothing, movement). For crowd flow.
- Recognition (125 ppm): Recognise acquaintances. For verifying personnel.
- Identification (250 ppm): Identification of unknowns. For clear facial features as evidence.
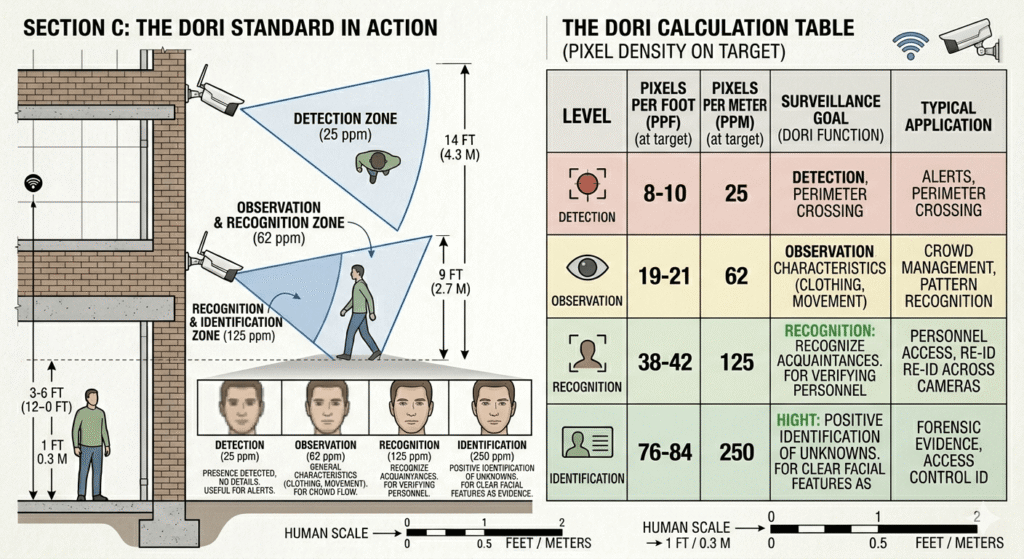
Calculating CCTV field of view and pixel density involves focal length, sensor size, and distance. Online FOV calculators simplify this. Shorter focal length (wider angle) covers more area but reduces pixel density; longer focal length (narrower angle) provides higher pixel density over smaller, distant areas.
Overlap Requirements: The Key to Seamless Surveillance
Crucial for effective CCTV coverage zone design is 10-15% overlap between adjacent cameras. This redundancy:
- Eliminates Blind Spots: If one camera is obstructed, the adjacent one covers the activity.
- Ensures Continuous Monitoring: Seamless transition as subjects move between views.
- Provides Multiple Angles: Different perspectives for forensic analysis.
Identifying and Eliminating Blind Spots
Blind spots are unmonitored areas, creating vulnerabilities. Common blind spots:
- Directly Under Camera: Especially high-mounted, downward-angled cameras.
- Behind Obstacles: Columns, furniture, architectural features.
- Corners and Recesses: Difficult to cover with a single camera.
Strategies include corner placement, multiple cameras, site surveys, and CCTV design software to visualise views and pinpoint blind spots. Meticulous planning of CCTV coverage zones eliminates vulnerabilities.
-
Placement Best Practices for Specific Locations
Effective security camera placement requires tailoring strategies to each location’s unique needs.
Home Security
Focus on deterring intruders, monitoring entry points, and safeguarding valuables:
- Front Door: 2-2.5m (6.5-8ft), slight downward angle for clear facial images. Consider doorbell cameras.
- Back Door & Side Paths: Cover entire path, mounted at 5-3m (8-10ft).
- Garage & Driveway: Cover garage door and driveway at 3m (10ft) for overview of vehicles and individuals.
- Main Living Areas & Valuables: Indoor cameras in corners or overlooking high-value items for wide room views.
Office Environments
Protect assets, monitor traffic, ensure safety:
- Entrances & Reception: 2-2.5m (6.5-8ft) for facial identification, covering main entry and reception.
- Server Rooms: Monitor entrance and racks for clear views of equipment access.
- Common Areas: General surveillance at 4-3m (8-10ft) to monitor activity and deter unauthorized access.
Warehouse Security
Prevent theft, monitor logistics, and ensure safety in large spaces:
- Loading Docks: Cover entire dock, vehicle bays, and personnel movement at 3-4m (10-13ft).
- High-Value Storage: High-detail surveillance, potentially lower mounting for facial recognition.
- Aisles & Racking: High-mounted cameras (4-6m / 13-20ft) with wide-angle lenses for overview; narrower angles for specific high-value rows.
- Entry/Exit Points: Monitor all personnel and vehicle entry/exit for movement tracking and unauthorized access prevention.
Retail Store Security
Prioritise loss prevention, customer safety, and staff activity monitoring
- Cash Registers/POS: High priority. Mount at 2-2.5m (6.5-8ft) to clearly view transaction area, screen, and customer face.
- High-Traffic Aisles: Wide-angle cameras at 4-3m (8-10ft) to monitor customer flow and deter shoplifting.
- Entrances: Facial identification crucial. Mount at 2-2.5m (6.5-8ft), angled for faces.
- Changing Rooms: Monitor entrances/exits, never inside, respecting privacy and local laws.
Parking Lot Security
Comprehensive coverage against theft, vandalism, and assault:
- Entrances/Exits: Capture license plates at 1-1.5m (3-5ft) and driver faces at 2-2.5m (6.5-8ft).
- Pedestrian Walkways: Clear views for safety.
- Vehicle Rows: High-mounted cameras (4-6m / 13-20ft) on poles for wide coverage. Overlapping FOVs are critical.
Building Perimeter Security
First line of defence for early warning and evidence
- Corners: Maximise coverage along two sides, reducing camera count.
- Fence Lines: Cover entire fence line at 3-4m (10-13ft) to clear vegetation and deter tampering.
- Vulnerable Access Points: Dedicated coverage for gates, low windows, etc.
Tailoring surveillance camera positioning to specific needs builds effective security.
-
Common Placement Mistakes to Avoid
Even with knowledge of angles, heights, and coverage, common errors in CCTV camera placement can undermine surveillance. Avoiding these pitfalls is crucial.
Mounting Too High or Too Low
Inappropriate height is a frequent mistake. Too high, and only head-tops are captured, hindering facial recognition. Too low, and the camera is vulnerable to tampering or obstruction. Always refer to optimal height guidelines for your objective.
Pointing Directly into Strong Light Sources
Aiming a camera directly into bright light (sun, headlights) causes overexposure and lens flare, rendering footage unusable. Use WDR cameras or strategic positioning/physical shields to mitigate. This is a key consideration for CCTV camera angle.
Ignoring Privacy Concerns
Improper security camera placement can lead to legal and ethical issues. Avoid pointing cameras into private areas (neighbouring properties, bathrooms). Be aware of local laws and use privacy masking features.
Not Considering Environmental Factors
Environmental elements impact performance and longevity:
- Weather: Cameras need appropriate weatherproofing (IP ratings) for rain, snow, and extreme temperatures.
- Foliage: Trees/bushes can obstruct views. Ensure clearance or plan for trimming.
- Vibrations: Unstable mounts or vibrating structures cause blurry footage.
Inadequate Night Vision Planning (IR Reflection)
IR night vision is powerful, but improper placement causes issues. Placing a camera too close to a wall or reflective surface causes IR light to bounce back, creating a “white-out” effect. Ensure a clear line of sight and avoid reflective materials.
Forgetting About Maintenance Access
Cameras require periodic maintenance. Placing them in hard-to-access locations makes maintenance difficult, potentially leading to neglected systems and degraded performance. Consider accessibility during CCTV camera placement planning.
-
Tools and Methods for Planning Camera Placement
Designing an effective surveillance system requires more than guesswork.
The Right Tool & methods optimise your CCTV camera placement.
Field of View Calculators
Online FOV calculators are invaluable. Inputting focal length, sensor size, and distance provides a visual representation of coverage and DORI levels. This aids in selecting the correct lens for the desired coverage and detail.
Site Surveys
A physical site survey is critical. Walk the premises, identify vulnerabilities, assess lighting, and determine optimal camera locations. This hands-on approach reveals obstacles or blind spots not apparent from floor plans.
CCTV Design Software
For complex installations, professional CCTV design software offers advanced planning and visualisation. Import floor plans, place virtual cameras, simulate FOVs, and analyse coverage in 3D. This ensures comprehensive coverage and identifies blind spots before installation.
-
Practical Table: Location-Specific Recommendations
This table provides a quick reference for optimal CCTV camera placement.
| Location Type | Recommended Height (m/ft) | Recommended Angle (degrees) | Lens Type | Coverage Area |
| Home Front Door | 2 – 2.5m (6.5 – 8ft) | 15 – 30° Downward | Standard (4mm) | Facial ID, Entryway |
| Office Reception | 2 – 2.5m (6.5 – 8ft) | 15 – 30° Downward | Standard (4mm) | Facial ID, General Area |
| Retail Cash Register | 2 – 2.5m (6.5 – 8ft) | 30 – 45° Downward | Narrow (6mm+) | High Detail, Transaction |
| Warehouse Aisles | 4 – 6m (13 – 20ft) | 45 – 90° Downward | Wide (2.8mm) | General Overview |
| Parking Lot Pole | 4 – 6m (13 – 20ft) | 15 – 30° Downward | Standard/Wide | Wide Area, Vehicle ID |
| Building Perimeter | 3 – 4m (10 – 13ft) | 15 – 30° Downward | Standard (4mm) | Intrusion Detection |
-
Tips for Night Vision / IR Camera Placement
Effective nighttime surveillance relies on Infrared (IR) technology. Proper placement maximises effectiveness and avoids issues.
Understanding IR Illumination
IR cameras use LEDs to illuminate scenes in low light/darkness. IR range varies; select cameras with IR range matching the required coverage. External IR illuminators can supplement built-in LEDs for larger areas.
Avoiding IR Reflection
Avoid placing cameras near walls or reflective surfaces that bounce IR light back, causing “white-out.” Ensure a clear, unobstructed view.
-
Conclusion: Securing Your Space with Smart Placement
A robust security system is built on strategic CCTV camera placement. Understanding angles, optimising heights, and meticulously planning coverage zones transform cameras into a comprehensive surveillance network. Effective placement balances wide-area coverage with crucial detail, tailored to your environment. Avoiding pitfalls and using planning tools ensures vigilance and actionable intelligence to protect assets and personnel.
-
Frequently Asked Questions (FAQ)
Q1: What is the ideal height for an outdoor security camera? A1: Generally, between 2.5 and 3 meters (8 to 10 feet). This balances a wide field of view, deterrence, and capturing useful details like facial features.
Q2: How do I avoid blind spots in my CCTV system? A2: Ensure CCTV coverage zones overlap by 10-15%. Use corner placement, conduct site surveys, and use CCTV design software to visualise and eliminate blind spots.
Q3: What does DORI stand for in CCTV? A3: DORI stands for Detection, Observation, Recognition, and Identification. It defines the level of detail a camera captures at specific distances, guiding camera and lens selection.
Q4: Can I point a CCTV camera directly at the sun? A4: No, direct sunlight causes overexposure and lens flare. Use WDR cameras or strategic positioning/physical shields to mitigate.
Q5: How much overlap should CCTV cameras have? A5: Aim for 10-15% overlaps in adjacent cameras’ fields of view for continuous monitoring and blind spot elimination.
Q6: What is the best lens type for wide-angle coverage? A6: A lens with a short focal length, typically 2.8mm or less, provides an expansive field of view (>60 degrees), ideal for large open areas or small rooms.