
Choosing a CCTV lens by guesswork is the fastest way to end up with a camera that “sees” the gate but can’t recognise the person standing in it. The Techubox CCTV Lens & Field of View Calculator takes the guesswork out. Enter your camera, lens and distance, and it tells you how wide the scene is, how many pixels land on your target,
This guide walks you through every part of the tool, with a worked example you can follow along.
Camera Field Of View Calculator by Techubox- Free to use
CCTV Lens & Field of View Calculator
Field of view, pixel density, DORI distances, mounting tilt and blind zone, with a printable report.
| Level | Needs | Max distance | Scene width there |
|---|
Uses nominal 16:9 (12MP: 4:3) active sensor sizes and the pinhole lens model; DORI thresholds per IEC 62676-4 (25 / 62 / 125 / 250 px/m). Real lenses vary by a few percent, and wide-angle lenses have barrel distortion. Distances are measured from the camera to the target (slant). Check final designs against the manufacturer's datasheet. Calculator by Techubox.com.
What the calculator tells you
In one screen you get:
- Horizontal field of view (the angle the camera covers, in degrees)
- Scene width at your target distance (in metres)
- Pixel density at the target (pixels per metre, px/m)
- The coverage level you reach, on the IEC 62676-4:2025 scale or the classic DORI scale
- A lens finder that gives the focal length you need for a chosen level or scene width
- Maximum distances for every level with your current lens
- Camera tilt and blind zone from your mounting height
- Top view and side view drawings of the coverage
- A printable report you can save as PDF for your client or project file
Step 1: Choose your camera
Sensor size. Pick the sensor format from the camera datasheet, for example 1/2.8” or 1/1.8”. You’ll find it under “Image sensor” (e.g. “1/2.8” Progressive Scan CMOS”). Sensor size and focal length together decide the field of view.
Resolution. Choose the camera’s main stream resolution, from 1MP (1280 × 720) up to 12MP (4000 × 3000). The calculator uses the horizontal pixel count, because that’s what spreads across the scene width.
Tip: Use the resolution you’ll actually record. If the NVR records a 2MP substream, a 4MP camera gives you 2MP pixel density.
Step 2: Enter the lens and distance
Focal length (mm). Enter the lens focal length, such as 2.8, 4, 6 or 12 mm. For a varifocal lens, enter the setting you plan to use.
Distance to target (m, horizontal). Enter the ground distance from the camera to the point you care about: the gate, the door, the till. This is the horizontal distance, not the slant distance. The tool works out the slant from the mounting height.
Or: scene width wanted at target (m). If you know how wide the view must be (for example, a 6 m wide driveway), enter it here instead. The lens finder will tell you the focal length that gives that width.
Step 3: Pick the level you need
This is the most important choice. Required level at target sets what you must be able to do with the image.
The calculator defaults to the seven levels of IEC 62676-4:2025:
| Level | Pixel density | What you can do |
|---|---|---|
| Overview | 20 px/m | See whether an object is moving or not |
| Outline | 40 px/m | Outline an object and its direction of movement |
| Discern | 80 px/m | Discern objects and their movements |
| Perceive | 125 px/m | Perceive characteristic details of people and vehicles |
| Characterise | 250 px/m | Type of person, gait, action; vehicle brand |
| Validate | 500 px/m | Validate a known person; read licence plates |
| Scrutinise | 1,500 px/m | Fine facial and object detail |
Many specifications and tenders still use the older DORI terms from IEC 62676-4:2014. Use the toggle at the top to switch to Classic DORI (2014):
| Level | Pixel density | What you can do |
|---|---|---|
| Detect | 25 px/m | Detect that a person is present |
| Observe | 62 px/m | See characteristic details (clothing, actions) |
| Recognise | 125 px/m | Recognise a known person |
| Identify | 250 px/m | Identify a person beyond reasonable doubt |
The level bar, the distance table, the lens finder and the drawings all follow whichever scale you pick.
Which level should I design for? Entrances and reception desks: Validate or better. Car park entries for number plates: Validate. Corridors and general areas: Perceive or Characterise. Perimeter fences and yards: Outline or Discern.
Step 4: Set the mounting
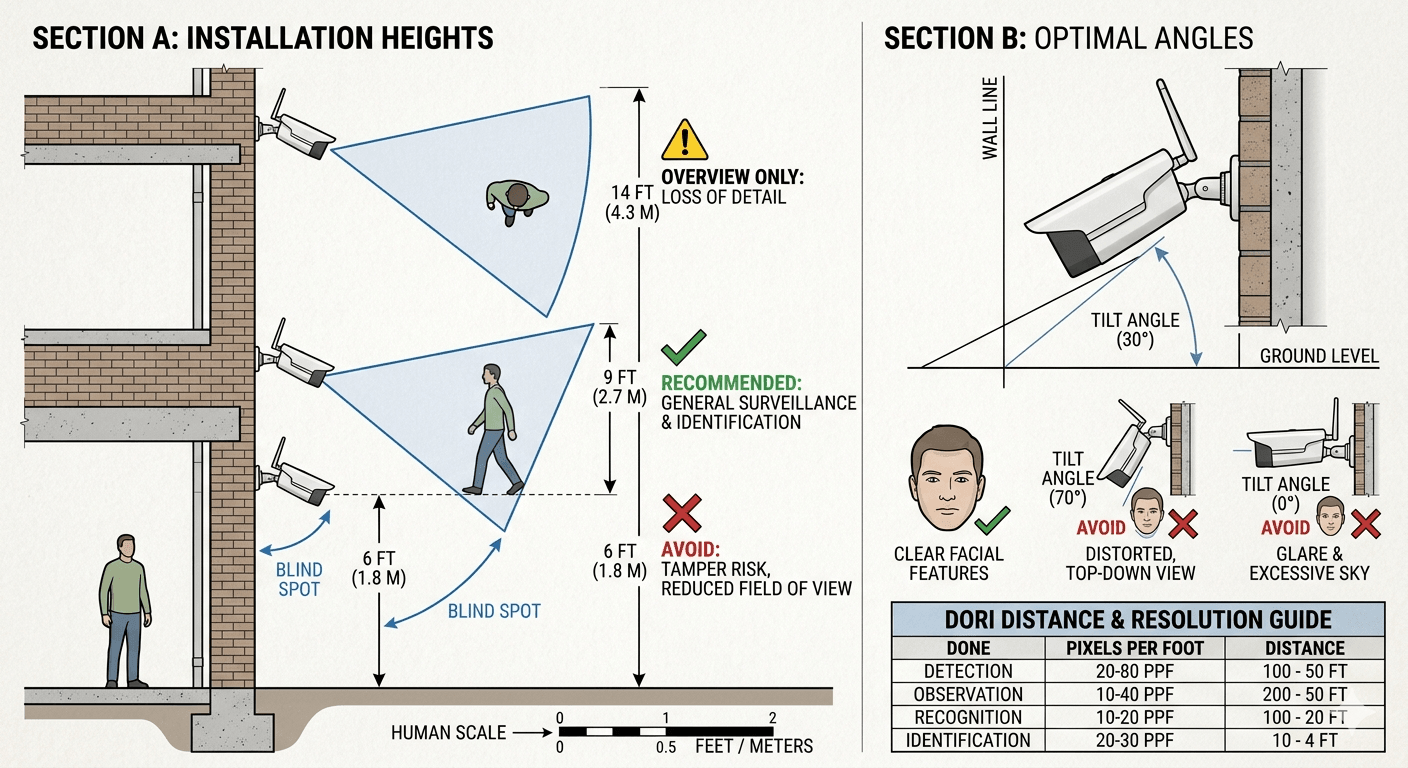
Camera height (m). How high the camera is mounted, for example 3 m on a wall.
Aim height (m). The height you want the centre of the image to hit at the target. Use about 1.5 m to aim at faces, or lower for vehicles and plates.
From these, the calculator draws the side view and works out:
- Tilt: how steeply the camera looks down
- Blind zone: the ground area under the camera it can’t see
- Whether the lower edge of the image ever meets the ground
The 13° tilt warning
A camera that looks down steeply sees the tops of heads instead of faces. A common design rule is to keep a fixed camera’s vertical tilt at 13° or less when you need usable faces. When your tilt goes above 13°, the tilt box turns red and the tool tells you exactly how to fix it: either lower the camera to a stated height, or keep the height and move the camera back to a stated distance.
Step 5: Read the results
Horizontal FOV and scene width. Check that the view covers everything you need at the target.
Pixel density at target. This is the number that matters. Compare it with your required level. The level bar shows where you are on the scale.
Coverage distances for this lens. A table of the maximum distance for each level with your current lens. It answers questions like “how far away can I still read a plate?”
Top view: coverage. The coverage wedge, coloured by level, so you can see where Characterise ends and Perceive begins.
Lens recommendation. If your current lens can’t reach the level you need, the lens finder gives you the focal length that will, plus a suggested lens type:
- Fixed 2.8 mm or wider
- Varifocal 2.8–12 mm
- Motorised zoom / long varifocal
- Long-range zoom or PTZ
Step 6: Print or save the report
Fill in Report details: project name, camera ID or location, and notes. Then press Print / Save as PDF. The report carries every input, the results, the level scale you used and the drawings, so you can attach it to a design submittal or send it to a client. Repeat for each camera position and you have a lens schedule backed by numbers.
Press Reset to start a fresh camera.
Worked example: a 4MP camera at a site entrance
You’re covering a site entrance with a 4MP (2560 × 1440) camera, 1/2.8” sensor and a 4 mm lens. The gate is 10 m away. The camera is on a wall at 3 m, aimed at faces (1.5 m).
What the calculator shows:
- Horizontal FOV: about 70°
- Scene width at 10 m: about 14.2 m
- Pixel density: about 180 px/m, which is Perceive on the IEC 2025 scale
- Tilt: about 8.5°, under 13°, so no warning
The coverage table tells you this lens reaches Characterise out to about 7.2 m, Validate to about 3.6 m and Scrutinise only to about 1.2 m.
The problem: at the gate you only get Perceive. You can see what a person is doing, but you can’t validate who they are or read a plate.
The fix: set the required level to Validate (500 px/m). The lens finder asks for a focal length of about 11 mm and suggests a varifocal 2.8–12 mm lens. The trade-off is a narrower view, about 5.1 m wide at the gate, so you may need a second, wider camera for the overall scene.
Now try the mounting. Raise the camera to 6 m. Tilt jumps to about 24° and the red warning appears. The tool tells you to mount it no higher than about 3.8 m, or keep 6 m and move the target point out to about 19.5 m.
That’s the whole design loop: check, see the gap, fix the lens or the mounting, and print the proof.
Common mistakes the calculator helps you avoid
- Choosing a wide lens “to see everything”. A 2.8 mm lens covers a lot of ground, but the pixels are spread thin. You’ll see the incident and not the face.
- Using slant distance. Enter the horizontal ground distance. The tool handles the height.
- Mounting too high. High cameras are safe from vandals but see the tops of heads. Watch the tilt box.
- Forgetting the recorded resolution. Pixel density comes from what you record, not what the camera can do.
- One camera for two jobs. Wide overview and close identification usually need two cameras.
Android App is available