SURVEILLANCE GUIDE
600-CAMERA PROJECT
From A to Commission & Testing
A Complete DIY Blueprint
Introduction: Why Define Before You Deploy
Six hundred cameras isn’t a surveillance system — it’s an infrastructure project. Whether you’re covering a stadium, university campus, industrial complex, or smart city block, the difference between a smooth commissioning day and a nightmare is almost entirely in how well you define the project before a single cable is pulled.
Most large CCTV projects fail at the commissioning stage — not because of bad hardware, but because of scope drift, undocumented decisions, and mismatched expectations between the installer, integrator, and end client. With 600 cameras the margin for error compounds fast.
| “Every hour spent in the definition phase saves roughly 8 hours of rework on-site. At 600 cameras, that math becomes existential.” |
This guide walks you through all 7 phases — from the blank-page scoping session to the final UAT sign-off. Every phase has a deliverable. Every deliverable has a checklist. Nothing is left vague.
PHASE 1 · WEEKS 1–2
Scope Definition & Requirements Gathering
Start with a structured discovery process. Schedule stakeholder workshops with security managers, IT, facilities, and legal/compliance teams. Everyone has a different idea of what ‘camera’ means to their department.
The 5 Core Questions
01. WHAT ARE YOU PROTECTING?
Assets, people, perimeter, or all three? The answer determines camera types and placement logic — a parking deck needs very different optics than a server room entry.
02. WHO WATCHES THE FOOTAGE?
24/7 control room? Reactive-only review? Remote VMS access? Each model demands different monitoring infrastructure and staffing. Define it before you design.
03. WHAT’S THE RETENTION MANDATE?
Legal or regulatory requirements (30, 60, or 90 days) drive your entire storage architecture. Get this confirmed in writing from legal before sizing storage.
04. WHAT ARE THE NETWORK CONSTRAINTS?
Existing fiber runs, wireless backhaul limitations, VLAN segmentation policies — always get this directly from IT. Don’t assume.
05. WHAT ARE THE SUCCESS CRITERIA?
Define ‘commissioned’ in writing before the project starts: uptime percentage, image quality benchmarks, integration test pass rate, response time SLAs.
Deliverable: The Project Definition Document (PDD)
- Site list with GPS coordinates and building/zone breakdowns
- Camera count per zone with justification (coverage map attached)
- Functional requirements — detection zones, analytics needed, PTZ coverage areas
- Non-functional requirements — uptime SLA, cybersecurity standard, weather IP rating
- Integration list — access control, alarm panels, PSIM, Active Directory
- Legal/compliance constraints — GDPR masking zones, retention policy, audit logging
- Stakeholder sign-off matrix with named approver
| PRO TIP
Never let the camera count drive the design. Walk the site with the security manager and draw coverage areas on a floor plan first — the camera count is the output of good design, not the input. |
PHASE 2 · WEEKS 2–4
Site Survey & Physical Assessment
No amount of planning replaces boots on the ground. A proper site survey for a 600-camera project is a 2–4-week exercise requiring a team of at least 3 people working in parallel across zones.
Survey Toolkit (DIY)
- Laser distance measurer — accurate coverage angle calculations
- Camera angle calculator app — JVSG CCTV Design or IP Video System Design Tool
- Lux meter — measure ambient light levels per zone, both day and night
- Cable trace tool — to map existing conduit routes before pulling new cable
- Network tester (Fluke or similar) — for existing cable quality certification
- Drone or 360 cameras — for large open areas and rooftop access
- Tablet with BIM/floor plan app — for live markup during walk-through
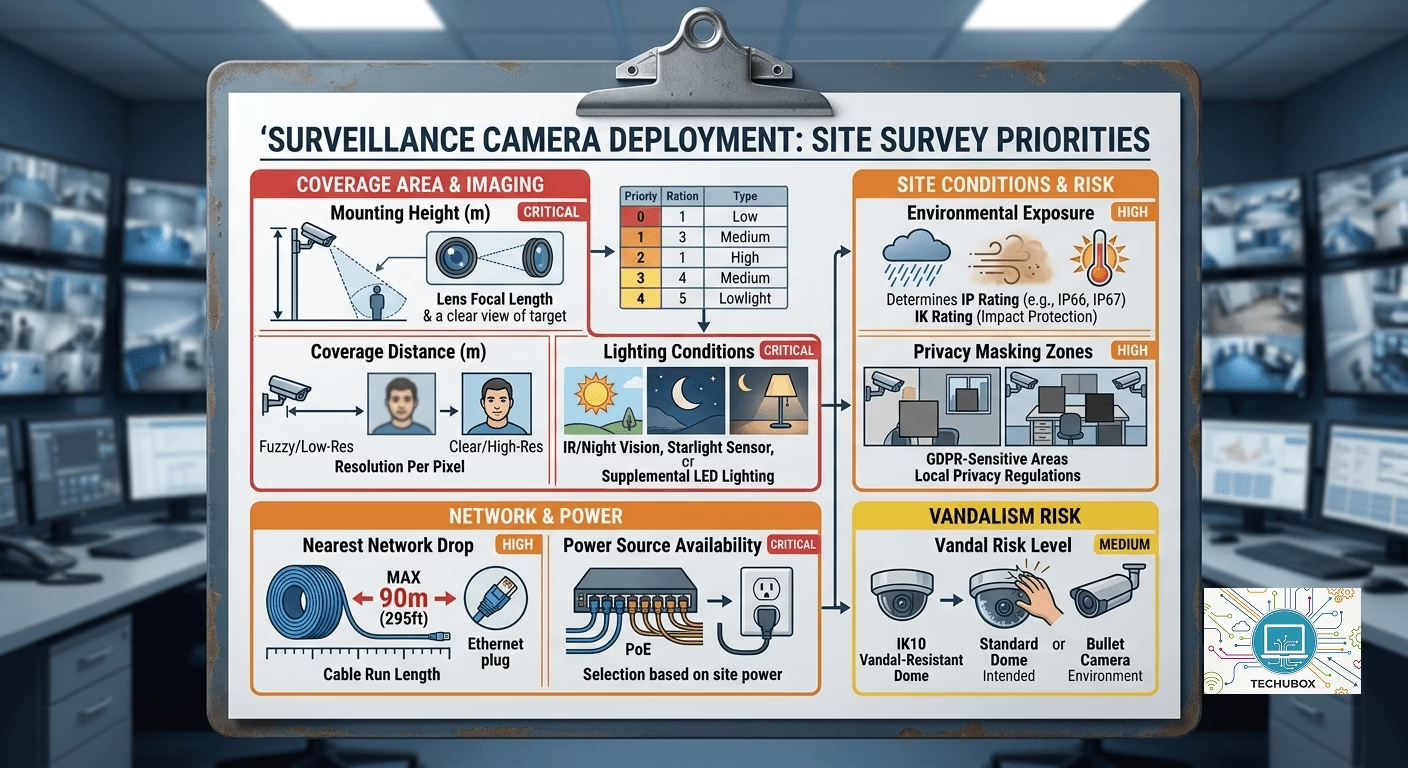
What to Record Per Camera Location
| Field | Why It Matters | Priority |
| Mounting height (m) | Determines lens focal length required | CRITICAL |
| Coverage distance (m) | Sets resolution per pixel requirements | CRITICAL |
| Lighting conditions | Decides IR, starlight, or supplemental lighting | CRITICAL |
| Power source availability | PoE switch location or local power drop | CRITICAL |
| Nearest network drop | Calculates cable run (max 90m Cat6) | HIGH |
| Environmental exposure | Determines IP/IK rating required | HIGH |
| Vandal risk level | IK10 dome vs. standard dome vs. bullet | MEDIUM |
| Privacy masking zones | GDPR-sensitive areas nearby | HIGH |
| COMMON MISTAKE — NIGHT SURVEY
Skipping the night survey is the #1 field error. Cameras that look perfectly placed in daylight often produce unusable footage after dark. Always survey at least 20% of locations at night before finalizing placements. |
PHASE 3 · WEEKS 4–7
System Architecture & Technical Design
This is where the engineering happens. You’re designing not just where cameras go, but an entire data pipeline from lens to storage to monitor to analytics engine.
Network Architecture for 600 Cameras
At 600 cameras, bandwidth is a serious infrastructure concern. A typical 4MP camera at H.265 streams at roughly 2–4 Mbps. Plan accordingly:
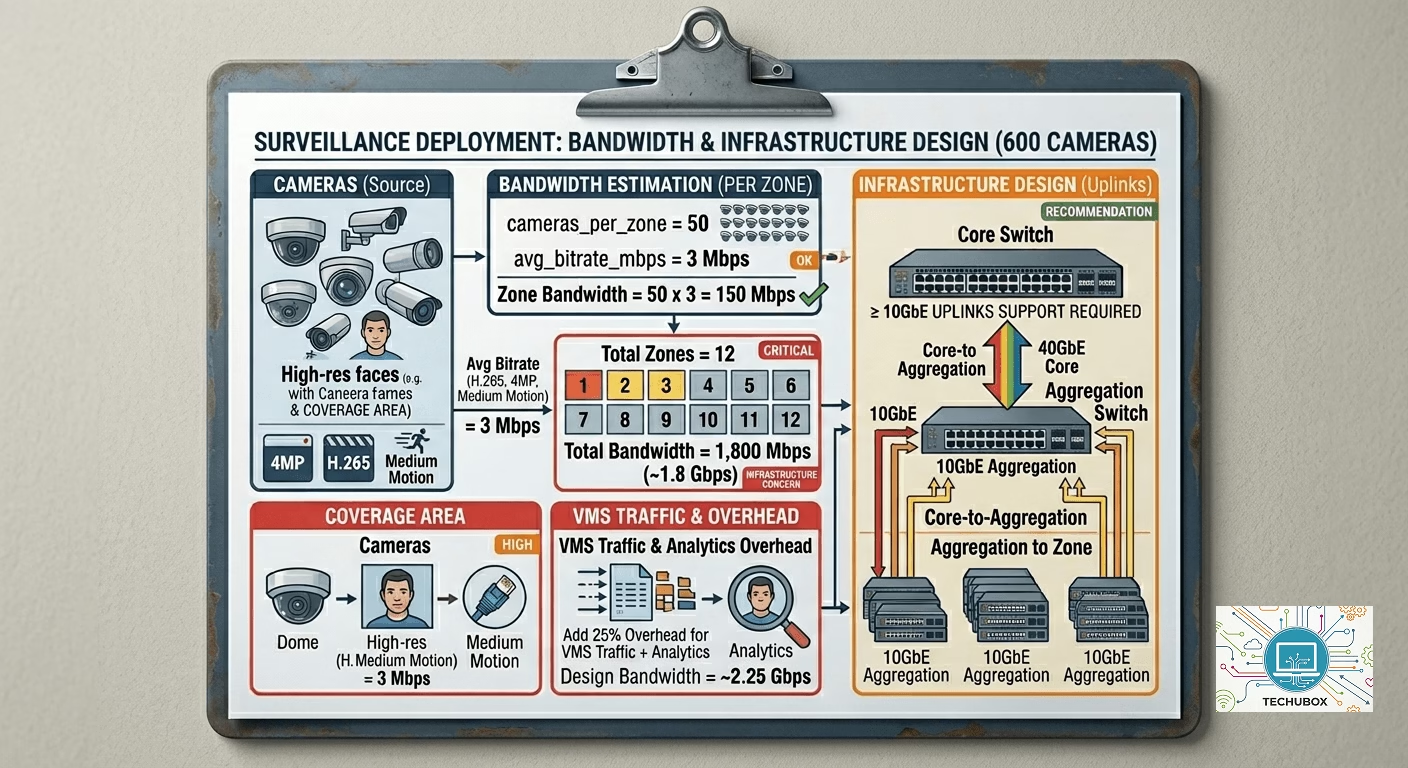
Network Design Principles
- Segment camera VLAN completely from corporate and guest networks
- Deploy PoE+ switches at edge — minimum 30W per port for PTZ cameras
- Use fiber backbone for inter-building runs — never copper beyond 90m
- Implement redundant uplinks (LACP bonding) on NVR and server uplinks
- Plan for AI analytics — over-provision bandwidth by at least 30%
Storage Design
Retention requirements are the biggest driver of hardware cost. Use this formula to size your storage correctly before purchasing:

VMS Platform Selection
| Platform | Key Strengths | Best For |
| Milestone XProtect | Open platform, huge camera compatibility, analytics marketplace | Enterprise / complex integrations |
| Genetec Security Center | Unified access + video, strong cybersecurity posture | Unified physical security |
| Avigilon Unity | Deep AI analytics native, best-in-class search | Analytics-first deployments |
| Hanwha Wisent WAVE | Budget-friendly, solid performance, native Hanwha optimization | Mid-market / cost-conscious |
PHASE 4 · WEEKS 6–10
Procurement & Bill of Materials
With 600 cameras, your procurement strategy is almost as important as your design. Small unit decisions compound massively at this scale.
Camera Type Mix (Typical Large Site)
| Camera Type | Typical % | Count (600) | Use Case |
| Fixed dome 4MP H.265 | 60% | 360 | Corridors, lobbies, parking |
| Bullet 8MP H.265 | 15% | 90 | Perimeter, long-range outdoor |
| PTZ 30x optical zoom | 8% | 48 | Large open areas, incident response |
| Fisheye 360 12MP | 7% | 42 | Atriums, concourses, single-camera rooms |
| License Plate Capture | 5% | 30 | Vehicle entry/exit points |
| Thermal / dual-spectrum | 5% | 30 | Perimeter intrusion detection |
Procurement Best Practices
- Standardize on 1–2 camera manufacturers max — reduces training, spares, and VMS licensing complexity
- Buy 5–10% spares (30–60 cameras) — you will need them during commissioning
- Negotiate on-site support from the VMS vendor for go-live week
- Specify exact firmware version in the PO — avoid last-minute compatibility surprises
- Request factory acceptance testing (FAT) documentation for all switches and servers
| DIY MONEY SAVER
For a 600-camera project, even a 5%-unit cost reduction saves tens of thousands. Issue a formal RFQ to at least 3 distributors with volume-based tiered pricing. Always request demo units and test them on your actual site before committing to a model. |
PHASE 5 · WEEKS 10–22
Installation & Cable Infrastructure
For a 600-camera project, installation is a multi-week, multi-crew operation. Proper sequencing is everything — poor sequencing causes rework, delays, and cost overruns that are difficult to recover from.
Installation Sequence
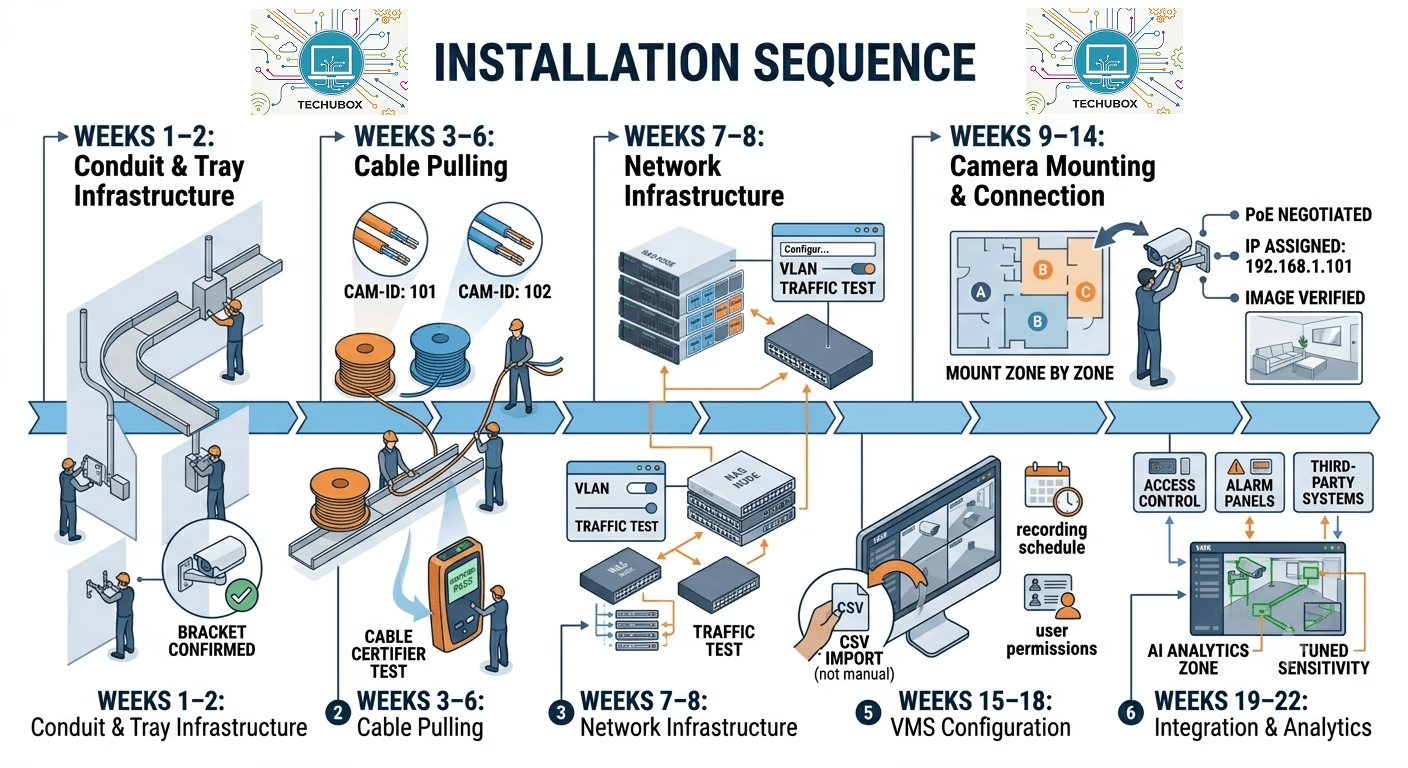
Weeks 1–2: Conduit & Tray Infrastructure
Install all cable trays, conduit runs, and junction boxes first. Confirm mounting bracket positions before cameras arrive on site.
Weeks 3–6: Cable Pulling
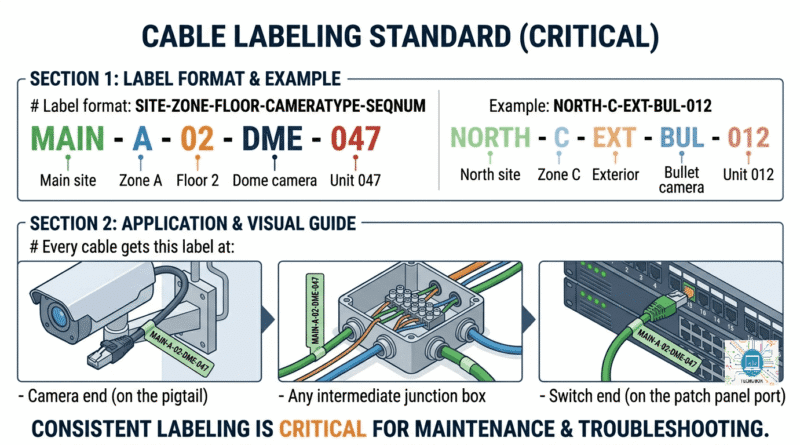
Pull Cat6A or fiber for all runs. Label every cable at both ends with the camera ID from your design drawings. Test every run with a cable certifier — fix failures now, not post-installation.
Weeks 7–8: Network Infrastructure
Rack, stack, and configure all switches, servers, and storage. Bring up the VLAN structure, confirm uplinks, and validate bandwidth with a traffic test before any cameras arrive.
Weeks 9–14: Camera Mounting & Connection
Mount cameras zone by zone. Power on, confirm PoE negotiation, assign IP from DHCP pool, and verify basic image quality before moving to the next camera. Never batch-mount without testing.
Weeks 15–18: VMS Configuration
Add all cameras to VMS, configure recording schedules, set up operator layouts, analytics rules, and user permissions. Import camera list via CSV — do not manually add 600 cameras one at a time.
Weeks 19–22: Integration & Analytics
Connect to access control, alarm panels, and any third-party systems. Configure AI analytics zones. Tune sensitivity settings per location based on real-world testing.
Cable Labeling Standard (Critical)
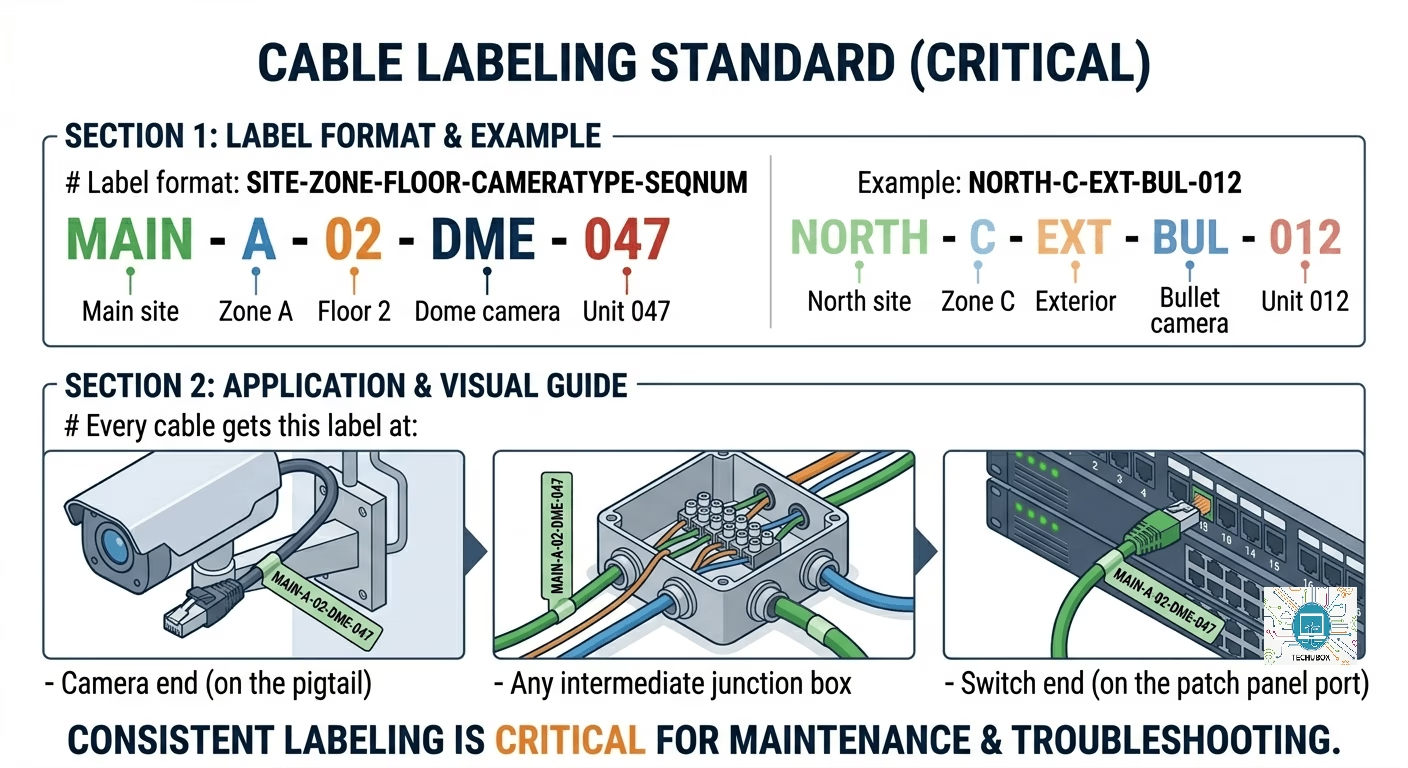
| CRITICAL RULE
Never commission cameras in batches of more than 50 without a full zone check. Issues discovered at camera 400 that originated at camera 12 are catastrophically expensive to fix. Build zone-by-zone sign-off into your project plan from day one. |
PHASE 6 · WEEKS 22–26
Commissioning & Functional Testing
Commissioning is the formal process of proving the system works as designed. It is not ‘turning it on and seeing what happens.’ A properly commissioned 600-camera system has documented evidence that every camera, every recording, every integration, and every alert was tested and passed.
The 5-Layer Testing Framework
L1 · PHYSICAL LAYER
Camera powered, mounted correctly, no physical damage. Cable certified. PoE voltage within manufacturer specification.
L2 · NETWORK LAYER
IP address assigned, ping response confirmed, VLAN membership corrects, no packet loss, bandwidth within design budget.
L3 · IMAGE QUALITY
Coverage area confirmed against design drawing. Focus sharp. Exposure correct in day and night conditions. No IR glare issues. Privacy masks applied and positioned correctly.
L4 · RECORDING & PLAYBACK
Recording confirmed active in VMS. Correct schedule applied. Playback tested successfully. Retention period confirmed. Failover recording path tested.
L5 · INTEGRATION & ANALYTICS
Event triggers fire correctly. Analytics detection zones active and tested. Third-party integrations confirmed. Alerts route to correct operator workstation.
Camera Acceptance Test — Per Camera Checklist
- Camera ID, location, IP, MAC address recorded in asset register
- PoE power draw measured and within manufacturer spec
- Day image reviewed — coverage area matches design drawing
- Night image reviewed — adequate image with IR or supplemental lighting
- Recording confirmed active on VMS (live stream + 1-hour playback test)
- Motion detection zone configured and walked-tested
- Privacy mask applied where required and position verified
- PTZ preset positions set and verified (PTZ cameras only)
- Camera name in VMS matches physical label and design drawing
- Tested by (signature and date recorded)
System-Level Testing
- Storage stress test: Run all 600 cameras 48hrs continuous, verify no dropped frames, confirm storage consumption matches calculation ±10%
- Failover test: Simulate NVR failure, confirm cameras fail over to secondary recording path
- Network failover: Disconnect primary uplink, confirm LACP redundant path takes over within 30 seconds
- Power failure test: Cut power to PoE switch, confirm UPS runtime meets requirement, verify graceful restart
- Concurrent access test: Log in 10+ operator workstations simultaneously, confirm system remains responsive
- Analytics false positive rate: Run each rule for 72 hours, document rate vs. agreed SLA
- Export/evidence test: Export video clip from each NVR node, confirm export plays on standalone viewer
| COMMISSIONING EFFICIENCY TIP
Build a spreadsheet with all 600 cameras pre-listed (exported from your VMS). Use conditional formatting so completed cameras turn green. Track your daily completion rate — at 600 cameras you need roughly 40–50 cameras commissioned per day to hit a 2-week commissioning window. |
The UAT (User Acceptance Testing) Phase
Before declaring the project complete, the client’s own security team must operate the system independently for 5–10 business days and sign off on a UAT checklist. This is both good practice and your legal protection.
- All operators trained on VMS — minimum 4 hours hands-on per operator
- Client successfully retrieves footage from 10 random cameras selected by client team
- Client tests alarm response workflow end-to-end without installer assistance
- Client confirms all integrations functional — access control, alarm, PSIM
- Snag list created and all critical items resolved before sign-off
- As-built drawings delivered — camera positions, network diagram, IP register
- System health dashboard visible and understood by client IT/security team
PHASE 7 · WEEK 26
Project Handover & Documentation
A commissioned system without documentation is a liability waiting to happen. Handover documentation is what makes the next engineer — 3 years from now — able to maintain and expand your system without calling you at 2 AM.
| “The system isn’t commissioned when all cameras are recording. It’s commissioned when the client can operate it without you.” |
Handover Package Checklist
- As-Built Drawings — Floor plans with actual final camera positions (not design positions)
- IP Address Register — Every camera, switch, server, NVR with IP, MAC, VLAN, location
- Network Diagram — Physical and logical, updated to as-built state
- VMS Configuration Backup — Full export of VMS database and configuration
- Camera Asset Register — Model, serial number, firmware version, warranty expiry per camera
- Storage Capacity Report — Current usage vs. designed capacity with projected full date
- Commissioning Test Records — Signed test sheet for all 600 cameras
- Warranty & Support Contacts — Camera, VMS, and network hardware vendor contacts
- O&M Manual — Daily checks, monthly tasks, how to add/replace a camera, VMS admin guide
- Training Records — Names, dates, and scope of all operator training delivered
PROJECT SUMMARY
Full Project Timeline at a Glance
| Phase | Activity | Duration | Key Output |
| 0 | Foundation & Kickoff | 1 week | Project charter |
| 1 | Scope & Requirements | 2 weeks | PDD (signed by all stakeholders) |
| 2 | Site Survey | 2–4 weeks | Survey data, coverage maps |
| 3 | System Design | 3 weeks | Network, storage, VMS design |
| 4 | Procurement | 4 weeks | BOM, purchase orders issued |
| 5 | Installation | 12 weeks | All cameras physically installed |
| 6 | Commissioning & Testing | 4 weeks | Signed test records, UAT passed |
| 7 | Handover | 1-week | Full documentation package |
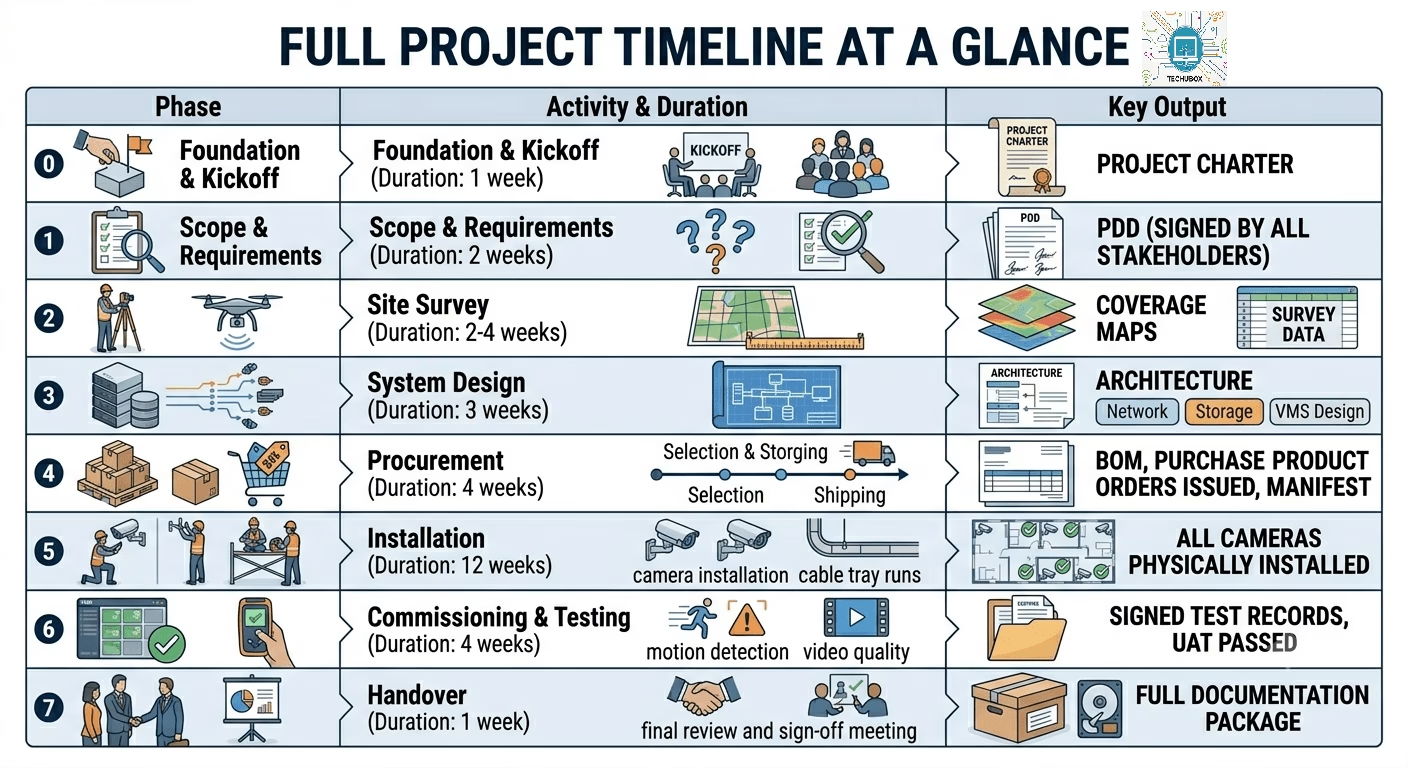
A well-run 600-camera project from kickoff to handover is a 26–30-week engagement. Anyone promising it in 8 weeks is cutting phases that will cause serious problems later. Build the timeline around the phases — not the other way around.
| FINAL DIY TAKEAWAY
The single biggest differentiator between a failing large-scale camera project and a successful one is documentation discipline. Every decision documented, every test recorded, every camera labelled. The hardware is the easy part — the system is built on paper first. |