
Troubleshooting Guide for CCTV
When troubleshooting camera issues, several steps can be taken to identify and resolve the problem:
- Ensure the camera is properly connected to the device or system
- Sometimes a simple restart can fix it.
- Ensure that the camera drivers are up to date.
- Verify that the camera settings are configured correctly.
- Hardware diagnostics may be needed on the camera to identify any physical issues that may be causing the problem.
One Camera Disconnects
Check Camera Logs: If the camera has logging capabilities, check for any error messages or disconnection logs.
Reboot the Camera: Sometimes, simply rebooting can resolve temporary issues.
Firmware Update: Ensure the camera firmware is up to date, as updates can fix bugs and improve stability.
Test with Another Cable: If possible, test the camera with a different network cable to rule out cable issues.
Inspect Power Supply: Ensure the power supply for the camera is functioning correctly and providing adequate power.
Many Cameras Disconnect
When facing the issue of many cameras disconnecting, it could be due to various reasons. Here are some technical steps to troubleshoot and address the problem:
Network Issues: Inspect the network infrastructure for issues like bandwidth limitations, congestion, or faulty equipment that may cause multiple cameras to disconnect.
Power supply problems: Ensure the power source is stable and sufficient for all cameras, and avoid overloading a single switch.
IP address conflicts: verify that each camera has a unique IP address assigned.
Physical Connections: Inspect the physical connections of the cameras to the network switch or recording device. Ensure that cables are securely plugged in and not damaged.
Network Configuration: Review the network settings and configurations for the cameras, Check the surveillance software settings for any configurations that may be impacting the camera connections
Video Server saturated: make sure the Video server is capable of handling multiple streams. Insufficient CPU or memory might delay or disconnect the camera.
No Video stream, but Ping is OK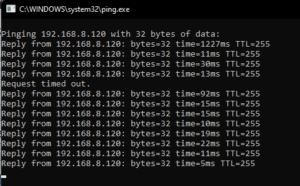
Check Camera Settings—Ensure the video format, resolution, frame rate, and stream settings are configured for perfect compatibility with your device or software for a superior viewing experience!
Network Bandwidth: Ensure that there is sufficient network bandwidth available to support the video stream.
Firewall and Port Settings: Confirm that the necessary ports for video streaming are open and properly configured on both the camera and the receiving device. Check firewall settings to ensure they are not blocking the video stream.
Update Firmware: Make sure that the camera firmware is up to date.
Video Decoding Software: Check the video decoding software or application being used to receive the stream. Ensure that it supports the video format and encoding used by the camera.
Test with Different Devices:
Restart Devices: Sometimes, a simple restart of the camera, network equipment, and receiving device can resolve connectivity issues and restore the video stream
Camera overload
A detailed troubleshooting guide for addressing camera overload issues:
Diagnostic: High FPS Settings
Possible Causes: Camera configured to capture too many frames per second
Possible Solutions: Set FPS to 15 or 30 FPS. Only record when motion is detected.
Diagnostic: Excessive Motion Detection Areas
Possible Causes: Too many areas set for motion detection
Possible Solutions: Limit the motion detection zones to only essential areas.
Adjust sensitivity settings to reduce false triggers.
Diagnostic: Multiple Streams
Possible Causes: Simultaneous streaming to multiple devices or servers
Possible Solutions: Limit the number of simultaneous streams. Use a dedicated server for video management, if applicable.
Diagnostic: High-Resolution Settings
Possible Causes: Camera set to an excessively high resolution
Possible Solutions: Lower the resolution settings to a more manageable level (e.g., from 4K to 1080p).
Consider using a variable bit rate (VBR) to adjust video quality dynamically.
Diagnostic: Insufficient Network Bandwidth
Possible Causes: The network is unable to handle the data load
Possible Solutions: Upgrade the network infrastructure (e.g., switch to Gigabit Ethernet).
Check for bandwidth usage by other devices and limit or schedule heavy usage times.
Diagnostic: Environmental Factors
Possible Causes: External factors affecting camera performance
Possible Solutions: Ensure adequate lighting/temperature for the camera to reduce strain during low-light or overheated conditions.
Blurred Image
Check Camera Lens: Inspect the camera lens for any dirt, smudges, or obstructions that may be affecting the clarity of the image.
Adjust Focus: Adjust the focus to achieve a clear picture.
Lighting Conditions: Poor lighting can result in blurry images.
Camera Positioning: Avoid glare, reflections, or direct sunlight.
Settings: Check the camera settings such as exposure, white balance, sharpness, WDR, BLC, and DNR shutter speed for day & night settings.
Resolution: Set the camera resolution to the appropriate level for the image desired.
Check Camera Cabling: Inspect the camera cables for any damage or loose connections.
Dark Black image during night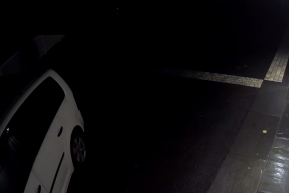
To resolve a very dark black image issue during nighttime in CCTV footage, consider these steps:
Infrared Illumination: Check if the camera’s infrared LEDs are functioning properly to provide night vision capability.
IR Cut Filter: Verify that the camera’s IR cut filter is switching over correctly during nighttime to allow infrared light to reach the image sensor.
Camera Settings: Adjust the camera settings such as exposure, gain, and IR sensitivity to optimise night vision. Adjust WDR (wide dynamic range) and DNR (digital noise reduction) settings. Adjust the shutter speed.
Ambient Light: Ensure there is sufficient ambient light in the camera’s field of view to support night vision.
IR Reflection: Avoid pointing the camera directly at reflective surfaces or objects that may bounce back IR light, causing black images. Adjust the camera angle if necessary.
Camera Placement: Position the camera strategically to capture a clear view during the night, avoiding areas with excessive shadows or obstacles that may block IR light.
Purple Image during the day
To troubleshoot a purple image issue during the day in CCTV footage, consider the following technical steps:
White Balance Adjustment: Check the camera’s white balance settings and adjust them to correct the colour temperature for daylight conditions. Check for strong light sources or reflective surfaces affecting the image.
Colour Correction Filters: Reset colour settings to default and adjust again.
Camera Calibration: Calibrate the camera settings such as hue, saturation, and colour temperature to eliminate the purple tint in the image and restore natural colours.
Camera Sensor Issues: Check for any potential sensor issues that may be causing color abnormalities.
Manually switch the IR cut filter between day and night modes several times, but the image remains purple.
The IR-cut filter can no longer be switched. Please contact RMA for assistance.
IR Reflection
Common Problems
Ghosting and Flare:
When IR light reflects off internal surfaces (like lens elements), it can create unwanted artifacts known as ghosting or flare.
Solution: Use lens coatings designed to minimize reflection and internal baffles to reduce stray light.
Color Cast:
IR light can cause a color shift in images, particularly when shooting in mixed lighting conditions.
Solution: Use IR cut filters to block IR light while allowing visible light to pass through.
Focus Issues:
Different wavelengths of light (visible vs. IR) focus differently, cameras may struggle to achieve accurate focus.
Solution: Adjustments in the camera’s auto-focus system.
Sensor Sensitivity:
Some camera sensors are inherently more sensitive to IR light, leading to overexposure or inaccurate colors in certain lighting conditions.
Solution: Use sensors with built-in IR filtering.
Heat Distortion:
In scenes with significant heat sources, IR radiation can cause distortion in the captured image, making it appear wavy or blurred.
Solution: Use heat-resistant materials and techniques to minimize the impact of heat on image quality.
Flicker Issue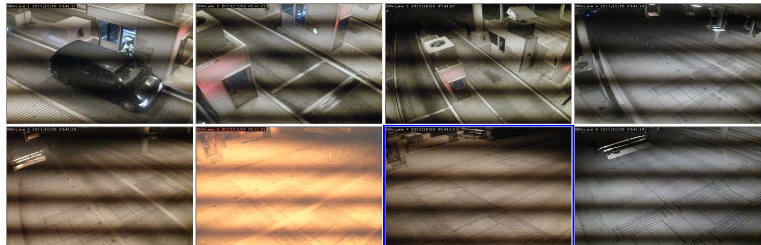
Fluorescent and LED Lights: These types of lighting often operate on alternating current (AC), which can cause flicker due to the rapid on-off cycling of light.
Solution: Use lights with a high frequency or flicker-free technology.
Shutter Speed Settings:
If the camera’s shutter speed is not synchronized with the flicker frequency of the light source, it can capture the fluctuations.
Solution: Adjust the shutter speed to match the frequency of the lighting (e.g., 1/50s or 1/60s for standard AC lighting).
Frame Rate:
if the frame rate of the camera doesn’t align with the flickering frequency of light source, it may capture flicker.
Choose a frame rate that corresponds to the light frequency (e.g., 25 fps or 30 fps).
Camera Settings:
Auto Exposure Adjustment: Cameras that automatically adjust exposure in response to light changes can introduce flicker.
Solution: Use manual exposure settings to maintain consistent lighting.
The power line frequency of camera is not matched to the frequency of power source
Solution
Match your camera’s frequency with the electrical frequency of your environment 50Hz or 60Hz.
The exposure time is faster than 1/240 sec.
Solution
Configure exposure time from camera menu smaller than 1/240 sec.
Abnormal Image
Blurry Images:
Causes: Poor focus, dirty lenses, or camera movement.
Solutions:
Adjust the focus manually or use auto-focus features.Clean the lens regularly to remove dust and smudges.Ensure the camera is securely mounted to prevent movement.
Color Distortion:
Causes: Poor lighting conditions, incorrect camera settings, or sensor issues.
Solutions:
Check and adjust the white balance settings.Ensure adequate lighting; consider using infrared (IR) cameras for low-light situations.
Test the camera with different lighting to identify issues.
Flickering Image:
Causes: Incompatible lighting sources (e.g., fluorescent lights) and incorrect shutter speed.
Solutions:
Adjust the shutter speed to match the frequency of the light source.Use flicker-free lighting options.
Overexposed or Underexposed Images:
Causes: Incorrect exposure settings or high-contrast scenes.
Solutions:
Adjust the exposure settings manually.Use features like wide dynamic range (WDR) to improve image quality in challenging lighting conditions.
Noisy Images:
Causes: Low light and high ISO settings leading to graininess.
Solutions:
Lower the ISO setting or use a camera with better low-light performance.Use noise reduction features in the camera settings.
Moire Patterns:
Causes: Fine patterns in the scene can create visual distortion.
Solutions:
Adjust the camera angle or distance to minimize the effect.Use cameras with higher resolution to reduce the appearance of moire.
Interference and Artifacts:
Causes: Electrical interference, poor cabling, or signal loss.
Solutions:
Use shielded cables or upgrade to higher-quality cabling.Ensure that all connections are secure and check for any sources of interference.