
How to connect Access Control to the Elevator
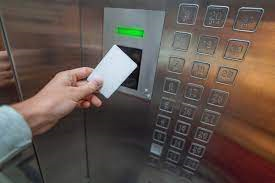
Touchless Lift Control Solution – Swiping the card, to call the elevator at the designated floor
Application Introduction
The Touchless Lift Control Solution provides a convenient way for users to access a specific floor by simply swiping their user card, without the need to PRESS the elevator button. This feature eliminates the step of reading a user card and then selecting the desired floor. It is designed specifically for environments that require a high level of hygiene and security, such as hospitals, Maternal and Child Centers, and Confinement Centers.
In most cases, individual users are granted access to a single floor, in addition to the public floors in community buildings. This solution not only allows users to reach their designated floor, but also provides access to public areas like the Lobby, Lounge, Roof, and more
 Hardware
 Hardware
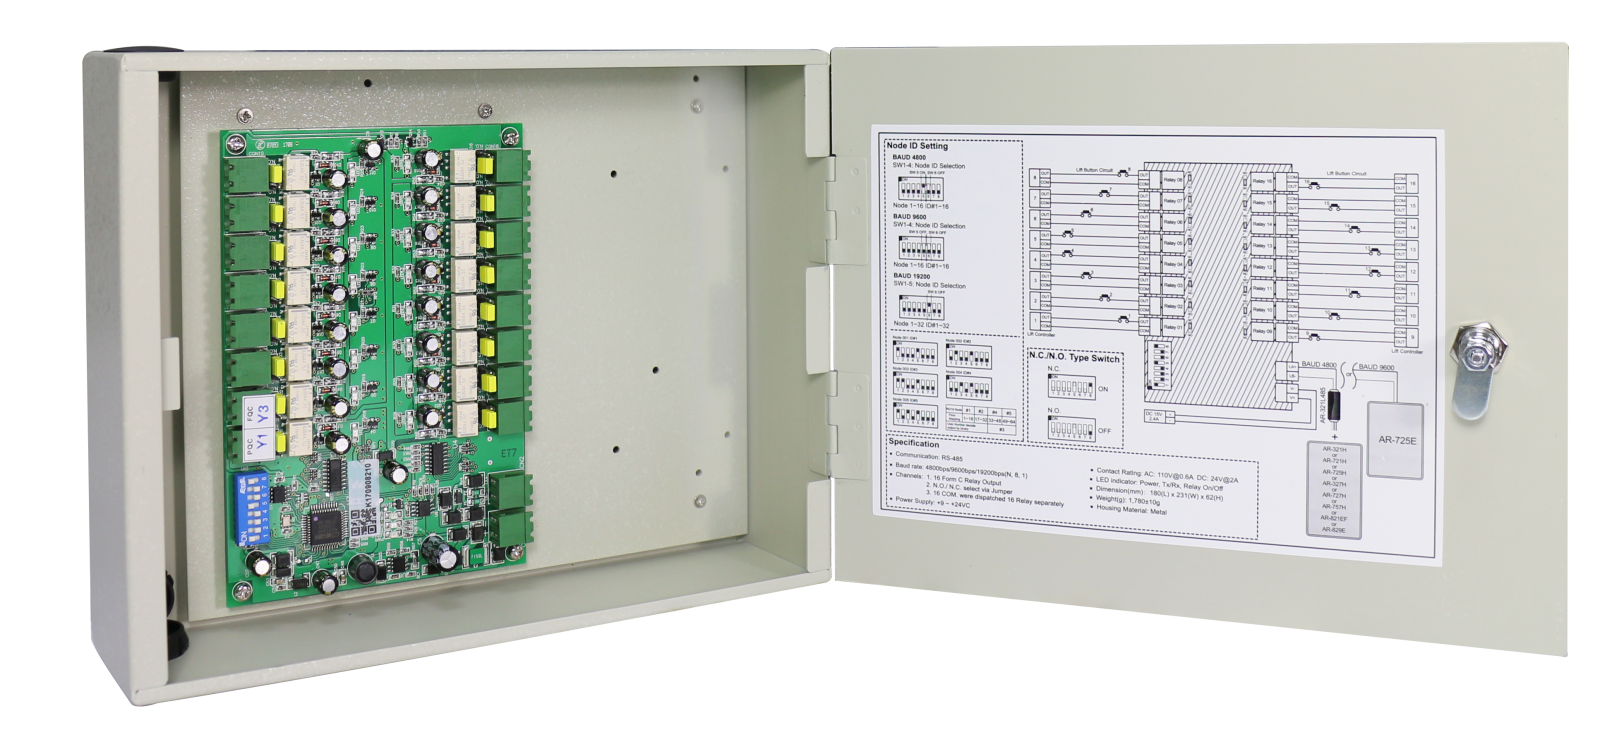
 The Lift Controller Panel, model AR-401-IO-0016R, offers the following features:
- To enable the automatic pressing of the lift button for a single floor, two units of AR-401-IO-0016R are required.
- To gain control over the public floors, please consolidate all public floor controls into a designated AR-401-IO-0016R unit that does not trigger automatic actions.
In cases where more than 16 floors are needed, the quantity of lift controller panels should be doubled to meet the requirements.

SOYAL offers a range of RS485 Controllers equipped with contactless RFID readers. Here are the various options available:
Economic:
AR-721H: Comes with a keypad.
AR-723: Keyless design.
AR-757: Features a keypad and doorbell.
AR-101H Mini: Compact size for space efficiency.
Fashion:
AR-725E: Equipped with an illuminated touch keypad.
AR-888: Designed for flush mounting.
Metal:
AR-321H: Encased in a durable zinc alloy housing.
AR-331H: Designed in a mullion-type form factor.
LCD Display :
AR-327H, AR-727H, AR-837E: These models feature an LCD. Additionally, the AR-837E offers optional features such as QR code scanning and fingerprint recognition.
These options provide flexibility in terms of functionality, design, and material, allowing users to choose the most suitable RS485 Controller with a contactless RFID reader for their specific needs.
Mini 101 Infrared Push Button Touchless Botton.

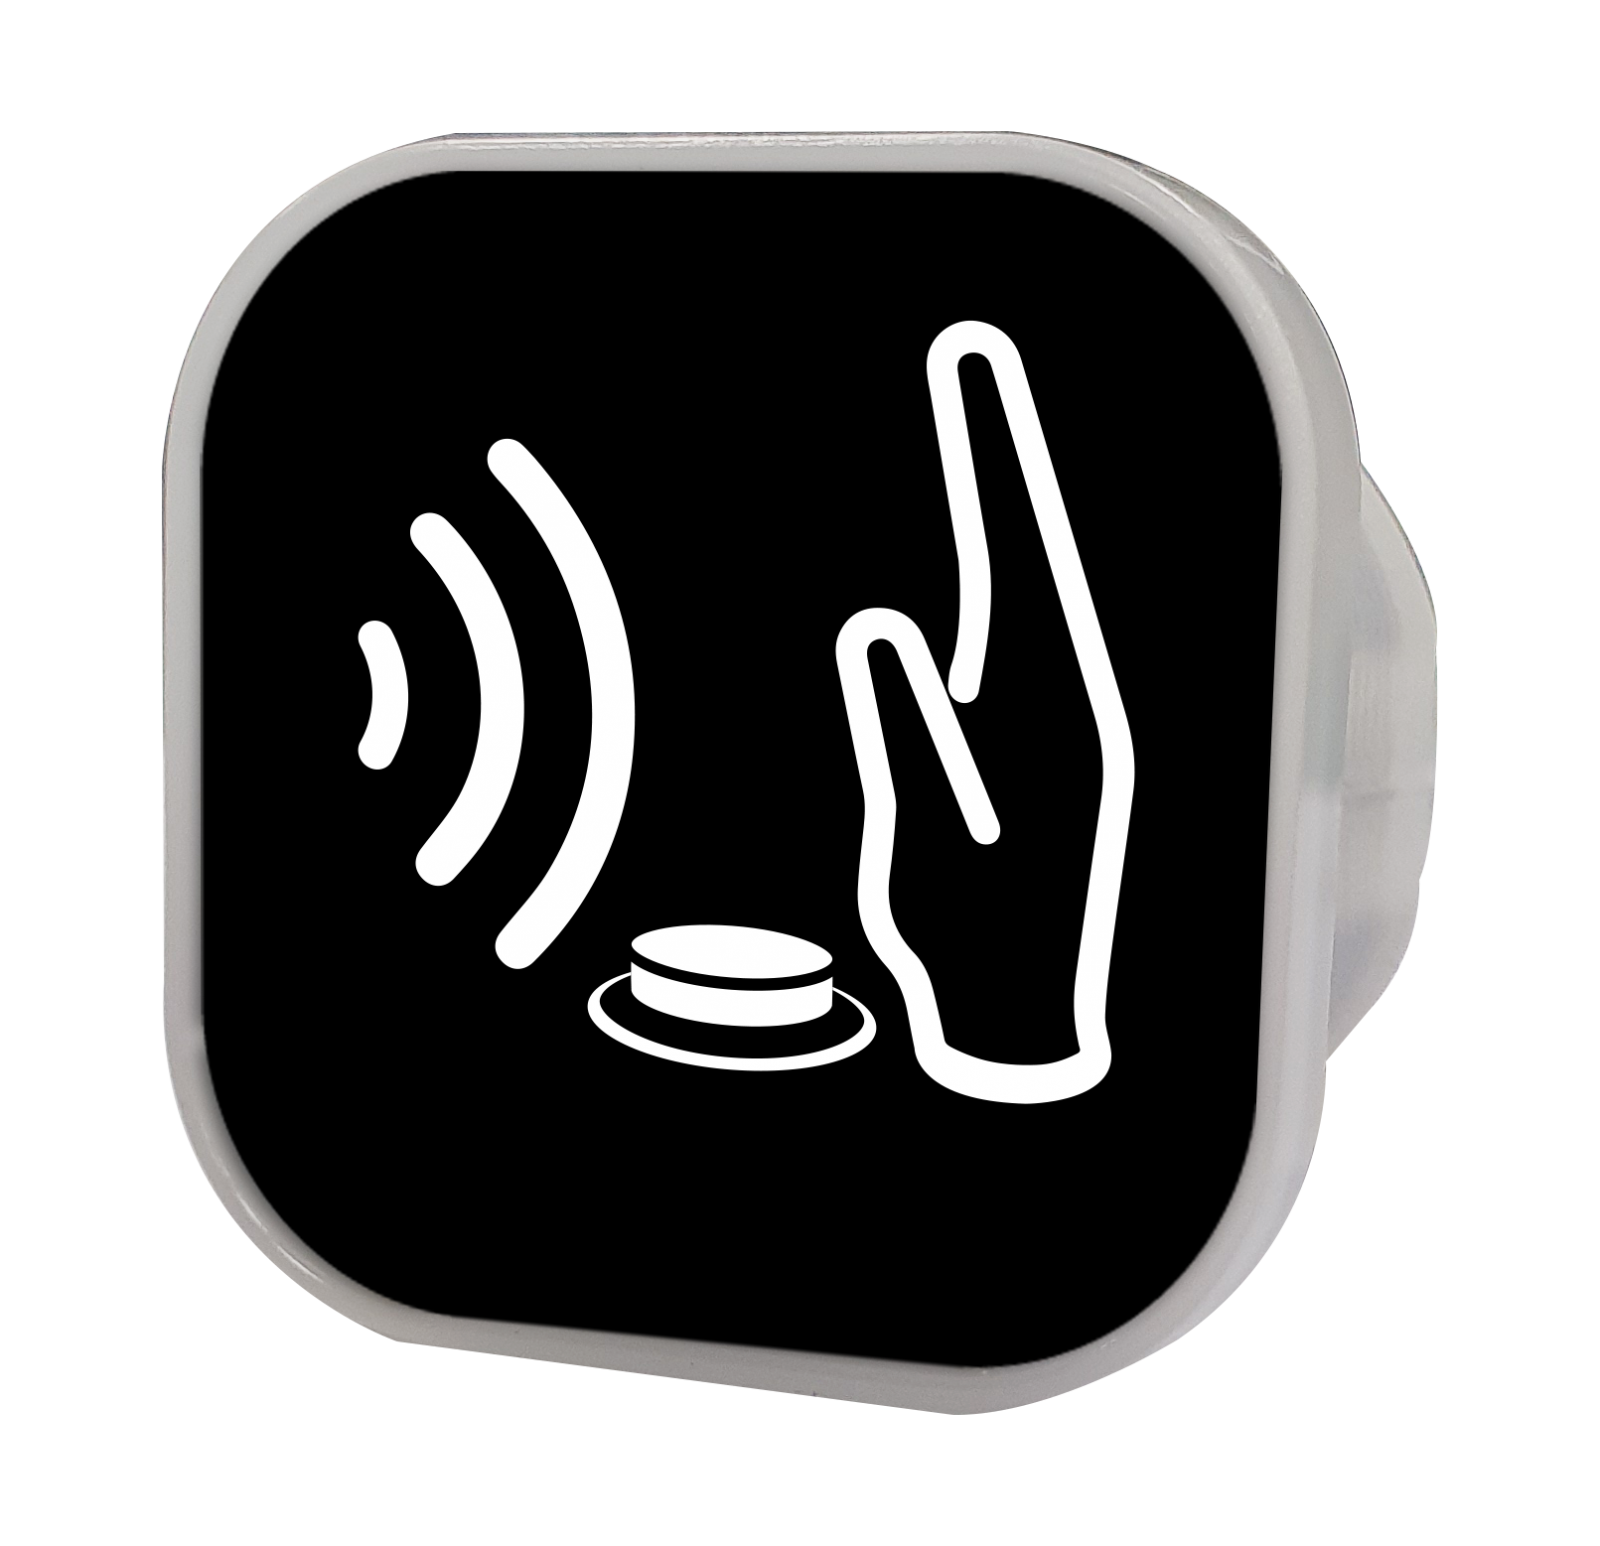

To enhance the user experience and convenience, replace the elevator button for the 1st floor with the AR-101PBI. With this replacement, there is no need to physically press the button to access the 1st floor. simply wave your hand near the button, and the infrared (IR) sensor will detect the motion and initiate the elevator’s movement.
Software & Firmware Installation & Nord ID No. Set-up
To enable the automatic pressing of a single floor’s lift button, you will need two units of the AR-401-IO-0016R controller. Here are the instructions for each controller:
- The first AR-401-IO-0016R should be equipped with the standard firmware provided by SOYAL.
- The second AR-401-IO-0016R requires a special firmware version: 401RO16_V0207_200407 Only1of16 for No Mode. ISP. To obtain this firmware version, please reach out to the SOYAL sales team. Once you have the firmware, update it using the ISP Tools.
- It is important to set up the same Nord ID number (Nord ID no. 1) for both AR-401-IO-0016R controllers to ensure proper functionality.
For controlling access to the public floors, all public floor controls should be consolidated into a specific AR-401-IO-0016R unit. It is crucial to assign a different Nord ID number (e.g., Nord ID no. 5) for this controller to differentiate it from others.
Wiring & Lift Number
- The first AR-401-IO-0016R, labeled as No. 1, is connected via a serial link, with all the communication points linked individually. The floor numbers remain unchanged. When a card is enabled for floors 1, 2, and 5, swiping the card will activate the corresponding floor buttons, following a typical floor control structure.
- The second AR-401-IO-0016R, labeled as No. 2, is connected in parallel, with all the communication points linked individually. The floor numbers remain unchanged. This controller utilizes special firmware and is connected in parallel with the floor buttons. When a command for a single floor is initiated, the corresponding floor button in the elevator will be automatically activated. However, if the card has access to multiple floors, the elevator button will not be activated. In other words, only the unique floor within these 16 floors will be activated.
- The third AR-401-IO-0016R, labeled as No. 3, is connected via a serial link, with all the communication points linked individually.

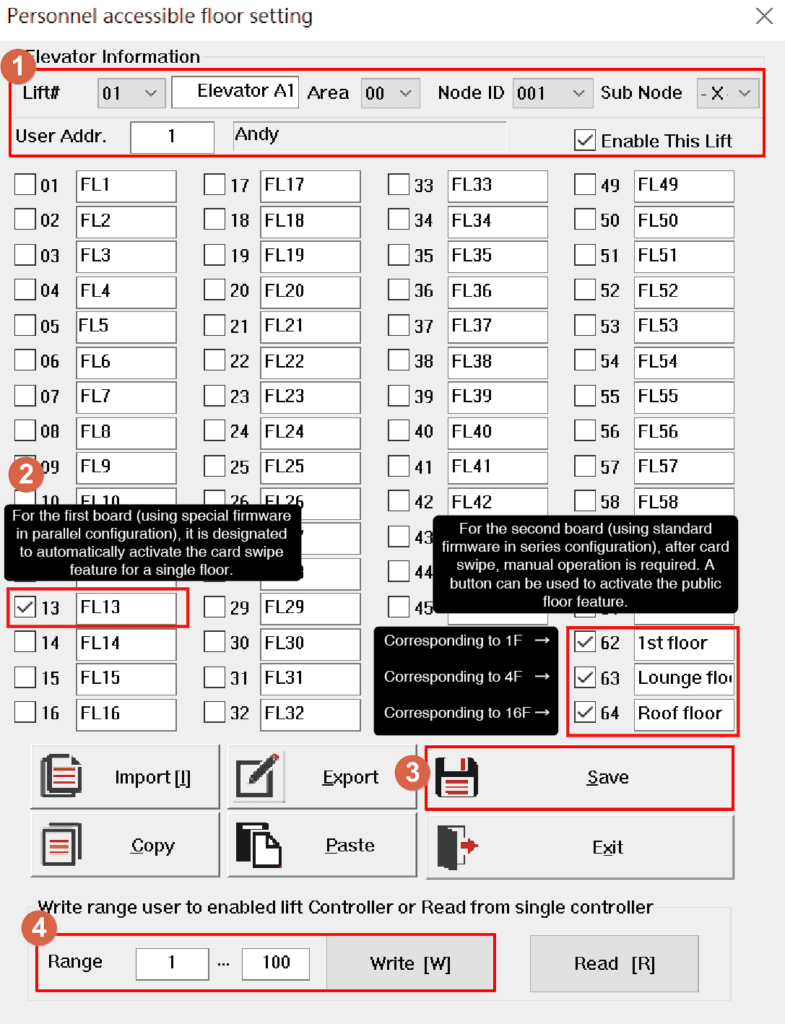
To effectively manage and control all the public floors, the AR-401-IO-0016R with station number set as 5 is used as the central controller. The control range for this controller is from 48 to 64. To ensure proper functionality, it is necessary to modify the floor number settings for the public floors so that they fall within this control range. This means we need to avoid using the original floor numbers and assign new ones.
For example, let’s consider the following modifications for the public floors:
1st floor (lobby) – Change floor number 1 to 62
Lounge floor – Change floor number 4 to 63
Roof floor – Change floor number 16 to 64
By making these adjustments, we ensure that the public floors are properly recognized and controlled within the desired range.
Now let’s move on to the software setup:
Software Set-up:
4.1 Enable Lift Control Setting:
To configure the lift control settings, follow these steps:
(1) Run the 701Server software.
(2) Click on the “H/E Serial Controller Parameter Edit” button in the Menu Bar.
(3) Select the target Node ID (e.g., Node ID 001).
(4) Click “Read from Controller” to retrieve the parameter settings from the controller.
(5) Change the RS485-3 port from “Default Host Comm. Port” to “Lift Controller”.
(6) Click “Write to Controller” to save the new parameter settings to the controller

Edit the Floor Access for Users: Using the 701Client Software
To modify the floor access for users, follow these steps using the 701ClientSQL Floor Access Editing tool (Version 10V5 and later):
Start by editing the elevator type, elevator name, controller zone code, and station number. Select the specific user and enable access to this elevator.
Edit the floor names and choose the specific floors that the user should have access to.
Once you have finished editing the elevator settings, click on the “Save” button to save the changes.
To download the customized elevator data based on the saved information to each elevator within the specified download range, click on the “Write” button. During the writing process, all enabled elevators that have been selected will be downloaded with the updated floor access settings.
By following these steps, you can efficiently customize and update the floor access settings for users, ensuring that they have appropriate access to specific floors within the designated elevator system.
User Operation: Simplified Floor Access:
With this solution, users can conveniently reach a single floor without having to manually press the elevator buttons. However, for public floors, users will still need to press the corresponding elevator buttons. Let’s consider an example: Suppose the designated single floor is the 13th floor, and the public floors are the 1st floor, the lounge on the 4th floor, and the rooftop on the 16th floor. When a user swipes their RFID card, the elevator button for the 13th floor will be automatically pressed. If the user wants to go to a public floor, such as the 4th floor, they will need to manually press the button for the 4th floor. Similarly, if the user wants to go to the 16th floor, the elevator will initially stop at the 13th floor unless the user cancels the 13th floor by pressing the respective button or allowing the elevator door to close and proceed to the desired floor.
User Operation: Important Checks:
Please ensure the following checks before proceeding:
☐ 1. Verify that the device firmware is correct, particularly the special firmware for active elevator calling, and confirm the station number configuration.
☐ 2. Double-check the wiring connections and ensure that the floor number settings are accurate.
☐ 3. Make sure that the parameters in the 701ServerSQL configuration include the necessary floor output settings.
☐ 4. Confirm that the 701ClientSQL is properly configured to enable floor editing.
☐ 5. Check the F. Download Items in the 701ClientSQL to verify the station number of the card reader.