

Deep Dive into iSCSI
A Deep Dive into iSCSI: Technical Details and Use Cases
Introduction
iSCSI, or Internet Small Computer System Interface, is a widely used protocol for facilitating data transfers over intranets and managing storage over long distances. It enables transmitting SCSI commands over IP networks, allowing for high-performance, low-cost storage area networks (SANs). This blog will explore the technical details of iSCSI, its architecture, how it works, and its practical applications.
What is iSCSI?
iSCSI is a transport layer protocol that works on top of the TCP/IP protocol. It allows SCSI commands to be sent over local area networks (LANs), wide area networks (WANs), or the internet. This enables organizations to create SANs using existing network infrastructure, which can be more cost-effective than Fibre Channel (FC) SANs.
iSCSI Architecture
Key Components
- iSCSI Initiator:
- The client device that sends SCSI commands. It can be a software initiator (implemented in the operating system) or a hardware initiator (a dedicated HBA or host bus adapter).
- iSCSI Target:
- The storage device that receives and processes SCSI commands. This can be a dedicated storage array, a network-attached storage (NAS) device, or even a server with storage resources.
- Sessions: An iSCSI session is established between an initiator and a target, allowing multiple connections for load balancing and redundancy.
- Network Infrastructure:
- The underlying IP network facilitates communication between the initiator and the target. This can include switches, routers, and other networking equipment.
-
Authentication and Security
- CHAP (Challenge Handshake Authentication Protocol): Provides a means for initiators to authenticate themselves to targets.
- IPsec: This can be used for encrypting iSCSI traffic, ensuring confidentiality and integrity.
-
Performance Optimization
- CDB (Command Descriptor Block): iSCSI uses CDBs to optimize the performance of SCSI commands over the network.
- Jumbo Frames: Support for larger Ethernet frames can reduce CPU overhead and improve throughput
How iSCSI Works
- Discovery:
- The iSCSI initiator discovers available targets using methods like Internet Storage Name Service (iSNS), SendTargets, or manual configuration.
- Login:
- The initiator logs into the target, establishing a session. This involves authentication (using CHAP or mutual CHAP) and negotiation of session parameters.
- Command Transmission:
- The initiator sends SCSI commands encapsulated in iSCSI PDUs to the target. These commands can include read, write, and other SCSI operations.
- Data Transfer:
- Data is transferred between the initiator and target over the established session. The iSCSI layer ensures that data is segmented and reassembled correctly.
- Session Management:
- The session is managed through various iSCSI PDUs, including keep-alive messages to maintain the connection and task management functions to handle command execution.
Advantages of iSCSI
- Cost-Effective:
- Utilizes existing IP networks, reducing the need for specialized hardware like fibre channel switches.
- Scalability:
- Easily scalable by adding more storage devices or expanding the network.
- Flexibility:
- It can be implemented in various environments, from small businesses to large enterprises.
- Performance:
- With advancements in network technology (like 10GbE and beyond), iSCSI can offer performance comparable to Fibre Channel.
Use Cases
- Data Center Storage:
- SCSI is commonly used in data centres to create SANs that provide high-performance storage for servers and applications.
- Disaster Recovery:
- iSCSI facilitates remote replication and backup, making it ideal for disaster recovery solutions.
- Virtualization:
- iSCSI is widely used in virtualized environments (e.g., VMware, Hyper-V) to provide shared storage for virtual machines, enabling features like live migration and high availability.
- Cloud Storage:
- iSCSI can connect on-premises infrastructure to cloud storage, enabling hybrid cloud solutions.
Step-by-Step Guide to Configure iSCSI for a Storage Server in a CCTV System
Configuring iSCSI for a storage server in a CCTV system involves setting up an iSCSI target (the storage server) and an iSCSI initiator (the CCTV system or NVR). This guide will walk you through the process step-by-step.
Prerequisites
- Hardware:
- Storage Server: A server with sufficient storage capacity.
- CCTV System/NVR: A network video recorder or CCTV system that supports iSCSI.
- Network Infrastructure: switches, routers, and cables to connect the devices.
- Software:
- Operating System: Windows Server, Linux, or a FreeNAS OS that supports iSCSI.
- iSCSI Initiator Software: Built into most modern operating systems or.
- CCTV software that supports iSCSI storage.
Step 1: Prepare the Storage Server
1.1 Install the Operating System
- Install a supported operating system on your storage server (e.g., Windows Server, Linux, or a NAS OS like FreeNAS).
1.2 Configure Network Settings
- Assign a static IP address to the storage server to ensure consistent connectivity.
1.3 Install iSCSI Target Software
- Windows Server:
- Open Server Manager.
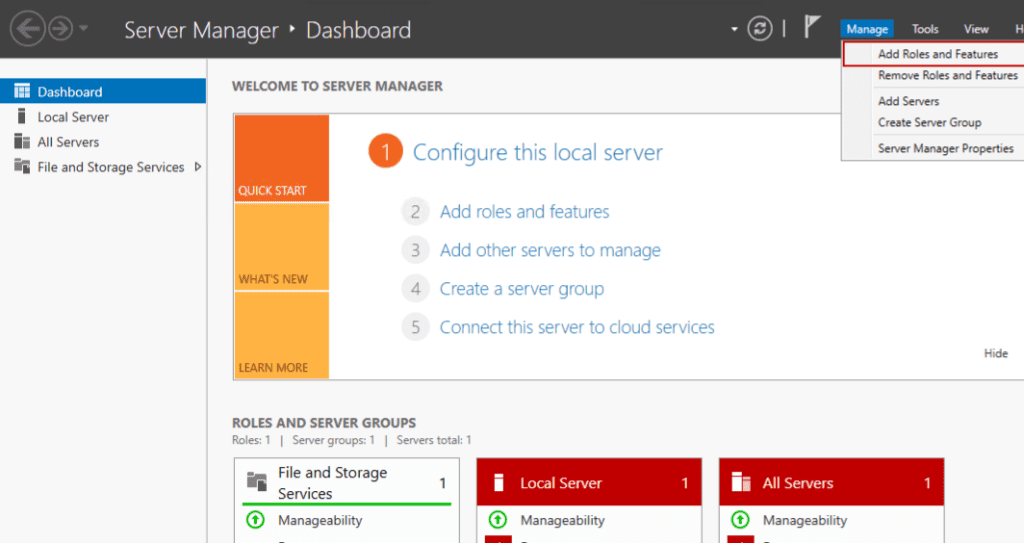
- Go to “Add Roles and Features.”
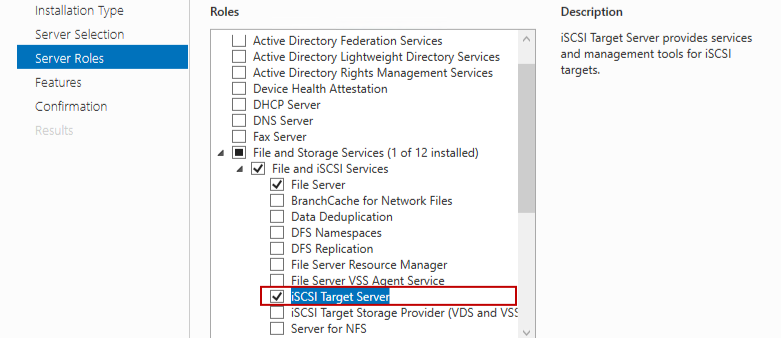
- Select “File and Storage Services” > “File and iSCSI Services” > “iSCSI Target Server.”
- Complete the installation.
- Linux:
- Install
targetcliorscsi-target-utilspackage. - Example for Ubuntu:
sudo apt-get install targetcli-fb
- Install
- FreeNAS/TrueNAS:
- iSCSI support is built in. Navigate to “Sharing” -> “Block (iSCSI)” to configure.
- Access the FreeNAS web interface
Step 2: Create an iSCSI Target
2.1 Create a Storage Pool (if not already created)
- Windows Server: To configure the iSCSI target server, you must install the “File and iSCSI Services” role in Windows Server. Open Server Manager, click on “Manage,” and select “Add roles and features.
-
- Open Server Manager.
 Add Roles and Features Wizard screen
 - Go to “File and Storage Services” > “Volumes” > “Storage Pools.”
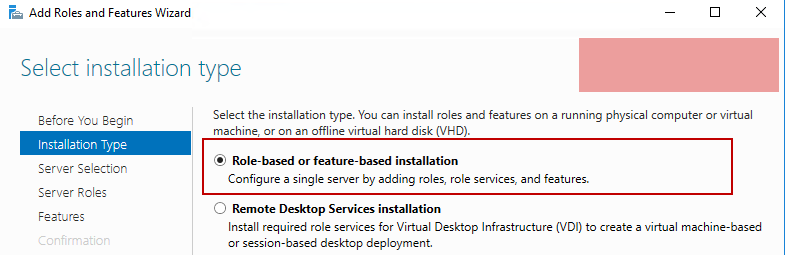
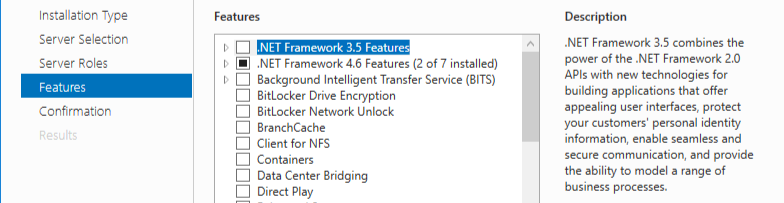
- Select the feature & Confirm the selection Review the summary and the server will reboot to save the configuration
- Once the iSCSI target server has been configured, create an iSCSI virtual disk.
- Launch Server Manager and expand “File and Storage Services.”
- Click on “iSCSI.”
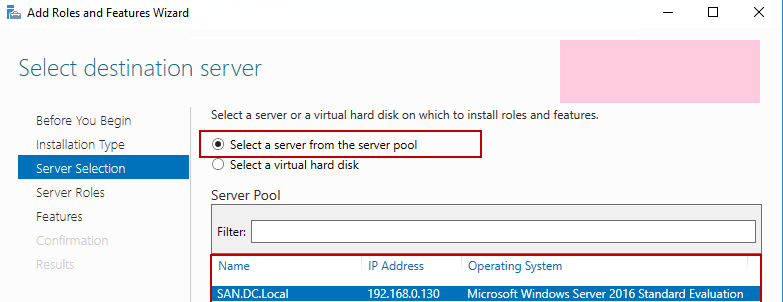
- On the right pane, click on “Start the new iSCSI virtual disk wizard.” The new iSCSI disk wizard starts. On the “Select iSCSI virtual disk location” screen, you can choose the location for the virtual disc. Multiple servers with the iSCSI Target Server role installed; the “Servers” text box will automatically list them. Select the desired server and the disk volume from the “Select by Volume” list. You can also provide the custom path in the “Type a custom path” text box. We are going to create a virtual disk on the C drive of the SAN.DC.Local hence, choose C: from the “Select by Volume
- Open Server Manager.
- Linux:
- Use
lvcreateto create a logical volume. - Example:
sudo lvcreate -L 1T -n iscsi_lv vg0
- Use
- FreeNAS/TrueNAS:
- Go to “Storage” -> “Pools” and create a new pool.
 Add Roles and Features Wizard screen
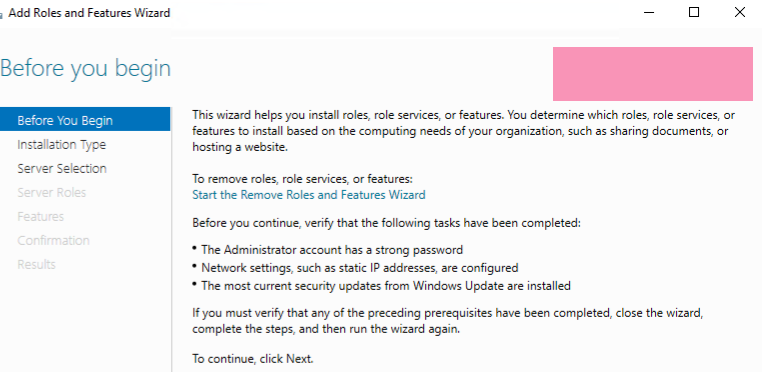
2.2 Create an iSCSI Target
- Windows Server:
- Open Server Manager.
- Go to “File and Storage Services” -> “iSCSI.”
- Click “To create an iSCSI virtual disk, start the New iSCSI Virtual Disk Wizard.”
- Follow the wizard to create a virtual disk and assign it to a new SCSI target.
- Linux:
Use ittargetclito create a target.- Example:
sudo targetcli
/> backstores/block create name=iscsi_disk dev=/dev/vg0/iscsi_lv
/> iscsi/create iqn.2023-10.com.example:storage.target
/> iscsi/iqn.2023-10.com.example:storage.target/tpg1/luns/ create /backstores/block/iscsi_disk
/> iscsi/iqn.2023-10.com.example:storage.target/tpg1/acls/ create iqn.2023-10.com. Example: cctv.initiator
/> saveconfig
/> exit
- FreeNAS/TrueNAS:
- Go to “Sharing” -> “Block (iSCSI).”
- Create a new target and assign the storage pool.
Step 3: Configure the CCTV System/NVR as an iSCSI Initiator
3.1 Install iSCSI Initiator Software
- Most modern operating systems have built-in iSCSI initiator software.
- Windows:
- Open “iSCSI Initiator” from the Control Panel or by searching for it.
- Linux:
Install theopen-iscsipackage.- Example for Ubuntu:
sudo apt-get install open-iscsi
- NVR:
- Refer to the NVR’s documentation for iSCSI configuration.
3.2 Discover and Connect to the iSCSI Target
- Windows:
- Open “iSCSI Initiator.”
- Go to the “Discovery” tab and add the IP address of the storage server.
- Go to the “Targets” tab, select the discovered target, and click “Connect.”
- Linux:
Edit to/etc/iscsi/initiatorname.iscsiset the initiator name.- Discover the target:
sudo iscsiadm -m discovery -t sendtargets -p <storage_server_ip> - Connect to the target:
sudo iscsiadm -m node -T <target_name> -p <storage_server_ip> -l
- NVR:
- Use the NVR’s web interface or configuration tool to add the iSCSI target.
Step 4: Format and Mount the iSCSI Disk
4.1 Format the Disk
- Windows:
- Open “Disk Management.”
- Locate the new disk, initialize it, and create a new volume.
- Linux:
- Use
fdiskorpartedto create a partition. - Format the partition:
sudo mkfs.ext4 /dev/sdX1
- Use
- NVR:
- Follow NVR’s documentation to format and use the iSCSI disk.
4.2 Mount the Disk
- Windows:
- Assign a drive letter to the new volume.
- Linux:
- Create a mount point:
sudo mkdir /mnt/iscsi - Mount the disk:
sudo mount /dev/sdX1 /mnt/iscsi
- Create a mount point:
- NVR:
- Configure the NVR to use the iSCSI disk for storage.
Step 5: Verify and Test
5.1 Verify Connectivity
- Ensure that the CCTV system/NVR can access the iSCSI disk.
- Check the storage server’s iSCSI target logs for any errors.
5.2 Test Recording
- Configure the CCTV system to record to the iSCSI disk.
- Verify that recordings are being saved correctly and that there are no performance issues.
Conclusion
By following these steps, you can successfully configure an iSCSI storage server for your CCTV system. This setup provides a scalable and cost-effective solution for storing surveillance footage, leveraging your existing network infrastructure. Whether you’re using Windows Server, Linux, or a NAS OS, iSCSI offers a flexible and reliable way to meet your storage needs.